


The Art of War
Life at War
The Art of War
Life at War
World War 1 Art
New Zealand’s World War 1 Art

New Zealanders created some fantastic art in response to the Great War. Some elaborate works were commissioned to commemorate battles or war heroes, whereas others are amusing cartoons or illustrations created by the soldiers themselves. You can view the full selection of New Zealand WWI art at the national Archives website: https://www.archives.govt.nz/search?image_category=WWI&type=image
Above Works:
1) ‘Zonnebeke’ by George Edmund Butler, c.1918 - c.1918
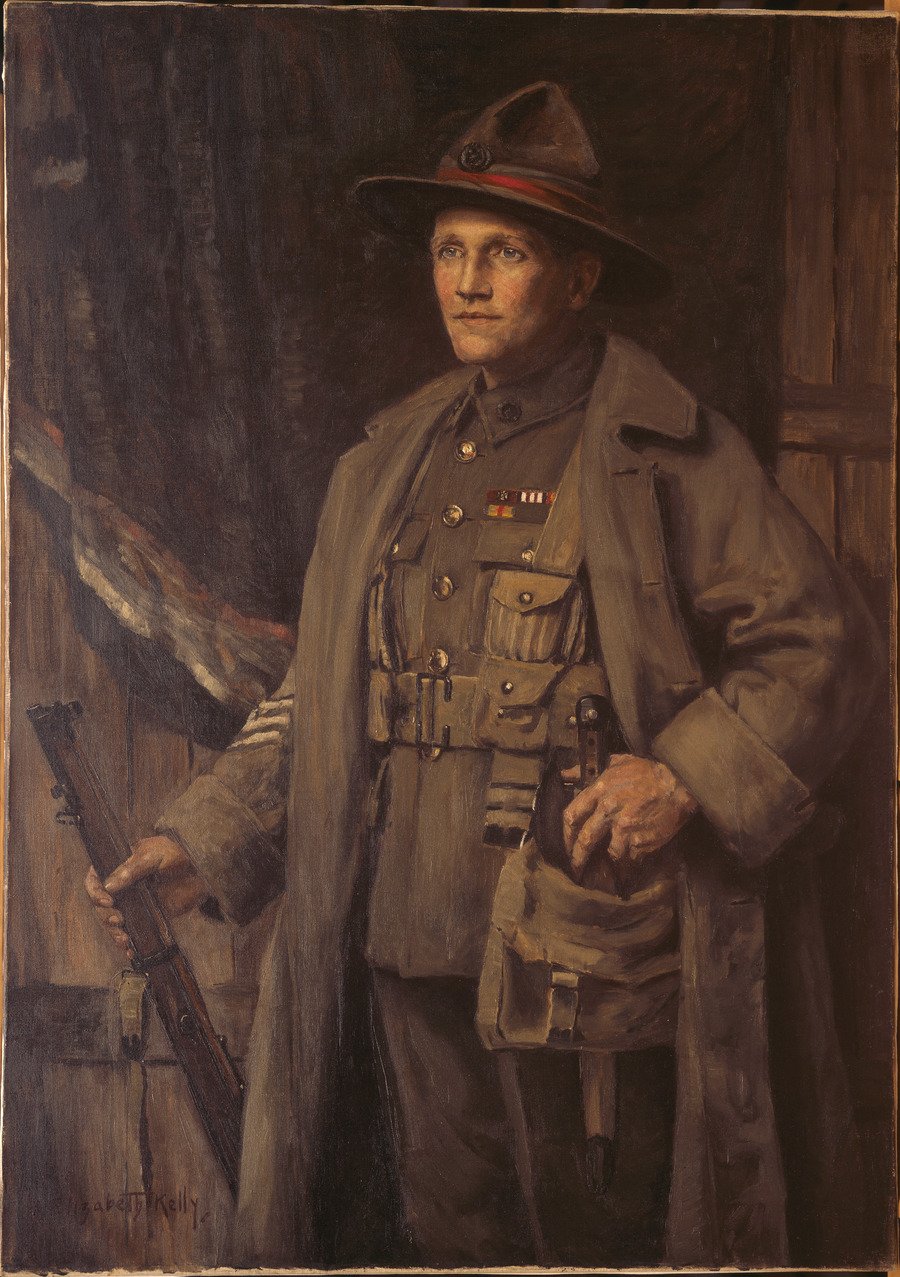
2) ‘Sergeant Henry James Nicholas, VC, MM’ by A. Elizabeth (Abbott) Kelly, 1920
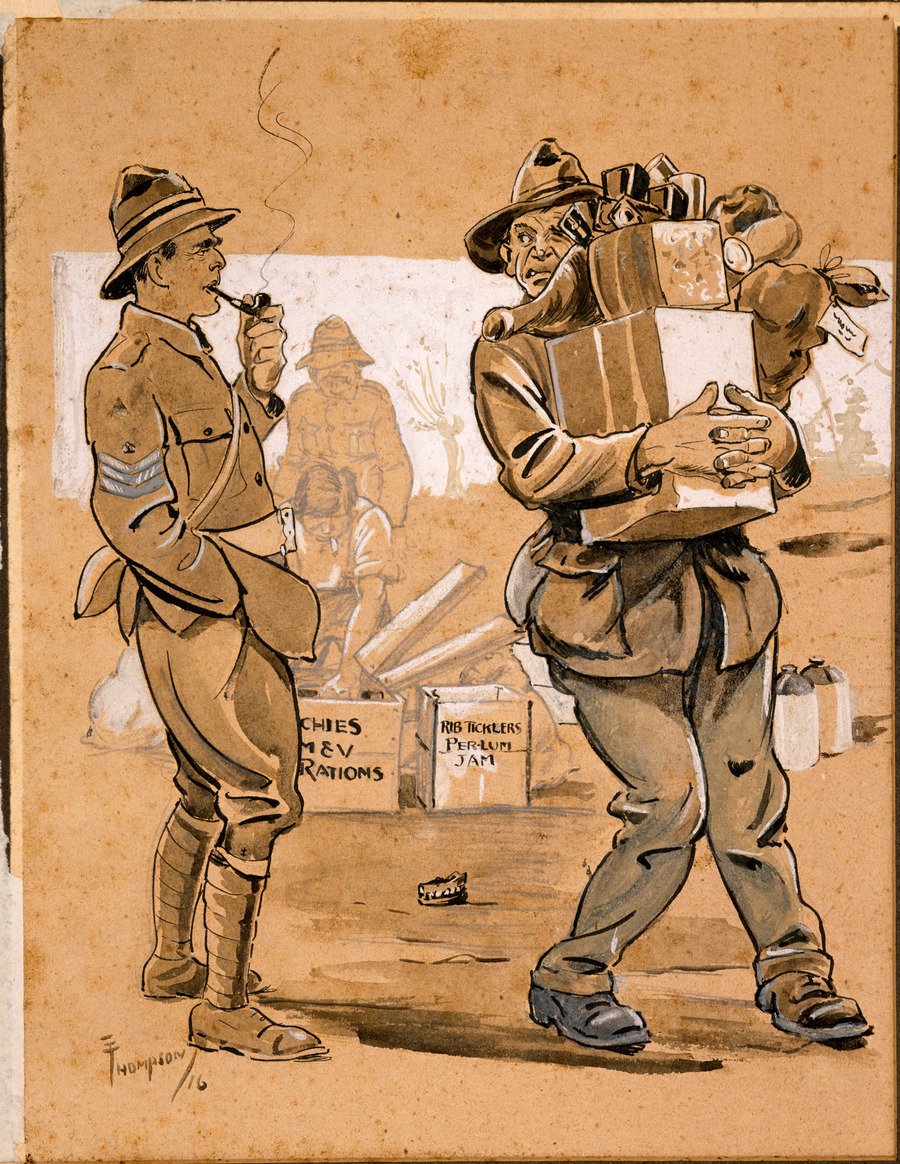
3) ‘The last straw’ by Ernest Heber Thompson, 1916
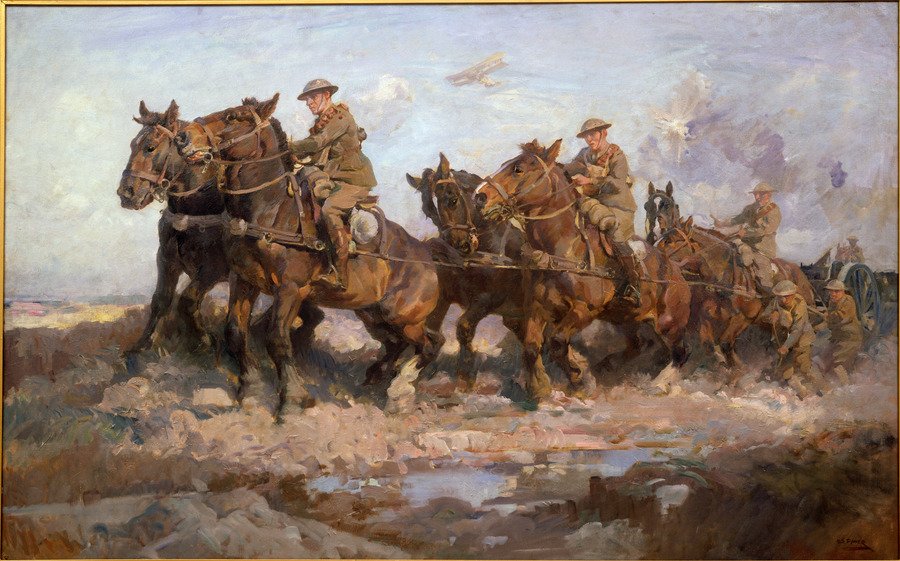
4) ‘Bringing up the guns’ by Harold Septimus Power, 1917
Other Notable World War 1 Art:


'Pack Up Your Troubles,' by Felix Powell is an optimistic British Marching song aimed at lifting the spirits of the men.
'It's a long way to Tipperary,' by Jack Judge, a wistful British Marching song that would have surely resonated with the Irish troops as it is about a town in Ireland.
A sad but hopeful song released in 1917, when the war was at its darkest for New Zealand. ‘Keep the Home Fires Burning’ reflects the understated anxiety of heeding the call to arms and leaving home for war. This song certainly conveys the desperate yearning of the men to return home and of their families to see them again.
A catchy, irreverent, song and a soldier’s favourite; this version was recorded for the credits of ‘They Shall Grown Not Old’ directed by New Zealander Sir Peter Jackson and features the voices of members of the British High Commission in New Zealand (in order to replicate authentic British accents). The lyric ‘we’ll all be back in a few short years’ is certainly a sorrowful foreshadowing of the Second World War.
Now from the other side of the trenches, 'Argonnerwaldlied,' by Hermann Albert Gordon. A German marching song about Argonne Forest, a key battleground during the closing days of 1917 and beyond.
You can find other Māori World War 1 songs here: https://www.folksong.org.nz/te_ope_tuatahi/index.html
Activities:
1) As a class, learn and sing either ‘Pack up your Troubles’ or ‘It’s a Long Way to Tipperary.’
2) Produce a World War 1 Propaganda Poster.
Artillery
Hell’s Orchestra: A sea of fired 105mm Artillery shells.
Artillery
Hell’s Orchestra: A sea of fired 105mm Artillery shells.
The Artillery: Whizz-bangs big and tall
The sound of the guns was the orchestral accompaniment to the Great War. The artillery was the most valuable asset a commander could have, capable of immense destruction in a variety of ways. Technology advanced quickly enabling the artillery guns to fire further and more accurately due to calculations that included humidity, distance and sometimes; took into account the curvature of the Earth. Artillery was responsible for the greatest number of deaths in the Great War despite the bolt action rifle being the most common weapon in the war. The big guns could fire a wide variety of shells, from explosive to gas.

Shrapnel Shells:
Among the most commonly used shells by all nations of the Great War, the shrapnel shell is so named for the metal balls it carries. Upon detonation, these metal balls disperse over a wide area and travel at great speed. Typically, shrapnel shells feature a timed fuse which is set to detonate the shell mid flight at a certain distance, this means that the shrapnel is able to travel further and affect a wider area of the battlefield. The shrapnel shells projectiles act much like a shotgun with multiple pellets that travel as fast as bullets when the shell detonates. Among the deadliest killers of the Great War, shrapnel shells did not often fail to detonate in the mud—as some HE shells did—with their timed fuses ensuring the shell due to their timers detonating them above ground, they did not often land in the mud and fail to explode like some HE shells.

High Explosive Shells
High explosive shells had long been a staple of the artillery since before the Great War, however, with the advances in accurately delivering artillery that the Great War brought, they could be used to even greater effect. Before the guns could even fire, the target could be precisely, ‘zeroed,’ on to the desired area, making it harder for the enemy to pin point the location of the artillery battery delivering the barrage and take it out. High explosive shells were most effective when employed against enemy fortifications such as trenches, pill-boxes or high value targets like the enemy’s artillery. Aerial reconnaissance revealed these locations which enabled the artillery to shell them with pin point accuracy. A new application for these shells during the Great War was the creeping barrage, a wall of shell fire that was precisely choreographed to act as a curtain behind which attacking troops could advance, protected from the enemy machine guns. A very tricky tactic that could go very wrong.The mud at Passchendaele affected the use of artillery in a number of ways. At Passchendaele, the guns had to be brought slowly through the mud and began to sink into it when firing. This threw off their aim and saw it occasionally land on friendly forces. Another impact of the muddy environment was shells with impact fuses that detonated when hitting the ground did not always detonate, even today, these and gas shells are being found in Flanders and occasionally, they go off. Finally, high explosive shells were employed very effective against the British tanks, not only did they put them out of action directly, but they turned the landscape into a muddy sea that the tanks could not pass through. HE shells also had the crucial job of breaking the barbed wire before the infantry assault.
A World War 1 poem about the High Explosive Shell. The German Guns: by Private Baldrick.
What’s the difference between a high explosive and shrapnel shell?

Check out Passion & Compassion 1914-18 to find these diagrams and more. See how these shells work with different fuses at: http://www.passioncompassion1418.com/decouvertes/english_fusees_munitions.html


Smoke Shells:
Smoke shells were designed to cover the movements of advancing infantry and were used in smaller numbers during most of the war. This is perhaps because the debris thrown up by a creeping barrage was sometimes enough to conceal attacking troops. The Smoke shell gradually became more and more widely used and it proved it’s worth in 1918. At the Battle of Cambrai smoke shells were used creatively by the Australian General Monash to fool the Germans into thinking it was gas and to hide the massive advance of the tanks in the allies successful 100 days offensive which swiftly broke the Hindenburg line, the Germans’ impressive defensive network.
Star Shells:
These shells were large flares for use at night, they used a parachute to slow their descent and light up a large area for short duration. Star shells were used to illuminate enemy night assaults and enable the defender’s machine gunners to find their targets in the dark.
New Page
British Soldiers Blinded By Gas
New Page
British Soldiers Blinded By Gas
Gas:

A Mustard Gas Bottle
Contained inside an artillery shell, this bottle breaks on impact releasing a cloud of gas.
Despite being banned by many international treaties, nearly all sides of the Great War used gas shells. While responsible for a relatively small number of deaths compared to the brutally effective shrapnel shell, gas has become synonymous with the Great War. Gas shells came in many different types and were used not necessarily to kill, but to make those affected unable to defend themselves before an offensive. That being said, gas could be very deadly if one did not put on their gas mask swiftly. Toward the end of the war, the Germans developed chemical warfare even further with a gas that could burn the skin meaning that even a gas mask could not protect those affected. Gas was a tricky weapon to use due to it being carried by the wind, meaning, it could be far more, or far less effective than expected. If planned poorly, a gas barrage could blow back toward those that fired it. Gas shells worked by containing a glass bottle with the chemical inside that shattered and emanated from the shell on impact.

Chlorine Gas:
Responsible for the eerie green glow we attribute to the Great War battlefields, this gas was a silent and insidious presence. Among the first gasses to be developed, the chlorine gas was used primarily by the Germans during the Great War. Chlorine gas effects the lungs, burning them from the inside but can also cause blindness. The Germans used this gas for the first time on the 22nd of April 1915 during the Second Battle of Ypres. They were so surprised by how effective it was, that they failed to attack far into a massive gap in the French Colonial lines that it had made. However, the development of increasingly more advanced gas masks eventually made it possible to remain inside of a chlorine gas attack with no ill effects, yet, gas masks are an obstruction that make it hard to aim a rifle, so chlorine gas was still employed before offensives.

Phosgene Gas:
Phosgene gas is the odd one out of all the gasses used in the Great War. Chlorine and mustard gas were employed for immediate results whereas phosgene was a poison that would take its toll over time. Soldiers exposed to phosgene gas would appear to be mostly fine until some time after, when it would develop a fluid in the lungs causing vomiting and difficulty breathing. The gas could also lead to heart failure due to it lowering the blood pressure of this affected. On the surface, this soldiers exposed to a lot of phosgene gas could develop lesions which are very painful sores on the skin. The purpose of this horrible weapon was to put soldiers out of the fight and create an influx of the sick and wounded in order to create a logistical problem for the enemy. It was very effective in this regard because the gas itself was colourless and difficult to notice, likewise, its effects could take over 48 hours to become apparent. Phosgene gas has a very distinct smell, like that of newly mown hay or pear drops, a British sweet which the soldiers named the gas after. Phosgene gas is very heavy, meaning it collected in low lying areas such as shell craters.

Mustard Gas:
While all weapons of war are brutal, few are quite so cruel as mustard gas. This gas burns the skin causes blistering, it also effects the mucus membranes inside the nose, ears and eyes. Due to mustard gas being able to effect those wearing gas masks, the Germans often used it in combination with the more deadly chlorine to prevent those affected from putting on their gas masks. It is by far the most debilitating gas of the war leaving its victims often horribly disfigured, yet it did not often kill. Mustard gas is named so because it smelled like mustard and it gathered in a yellow or orange cloud. Mustard gas was also name Yperiet because it was used near Ypres for the first time. Killing fewer than 5% of those affected, it may seem that mustard gas was not a very useful weapon, however, it was a powerful irritant that caused chaos in the enemy ranks and burned any exposed flesh. Mustard gas resulted in second and third degree burns as well as blindness though it was only developed later in the war and while used as often as it was available, it was not the most common occurrence on the battlefield.
Weapons of War
Small Arms: Weapons that a soldier can carry.
Weapons of War
Small Arms: Weapons that a soldier can carry.
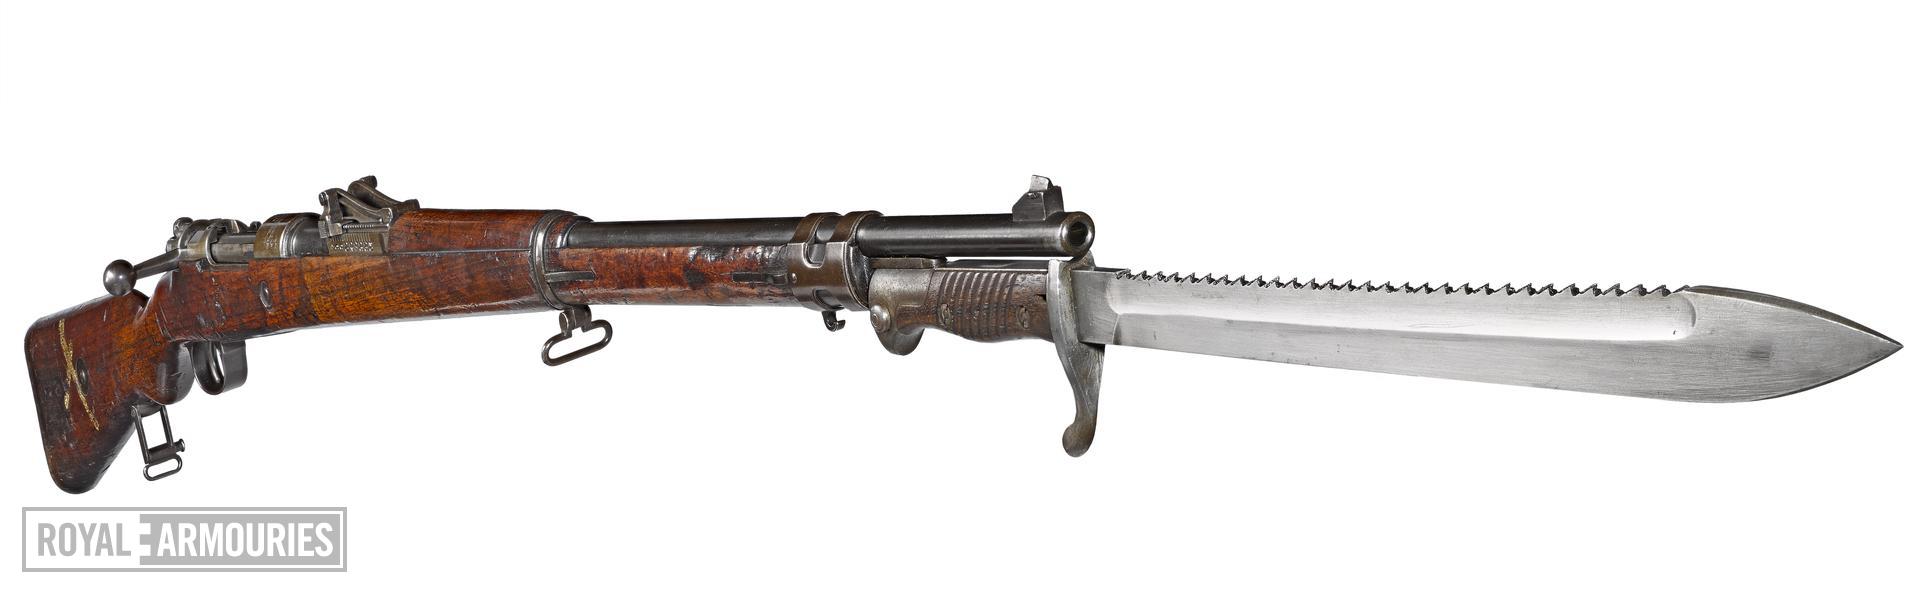
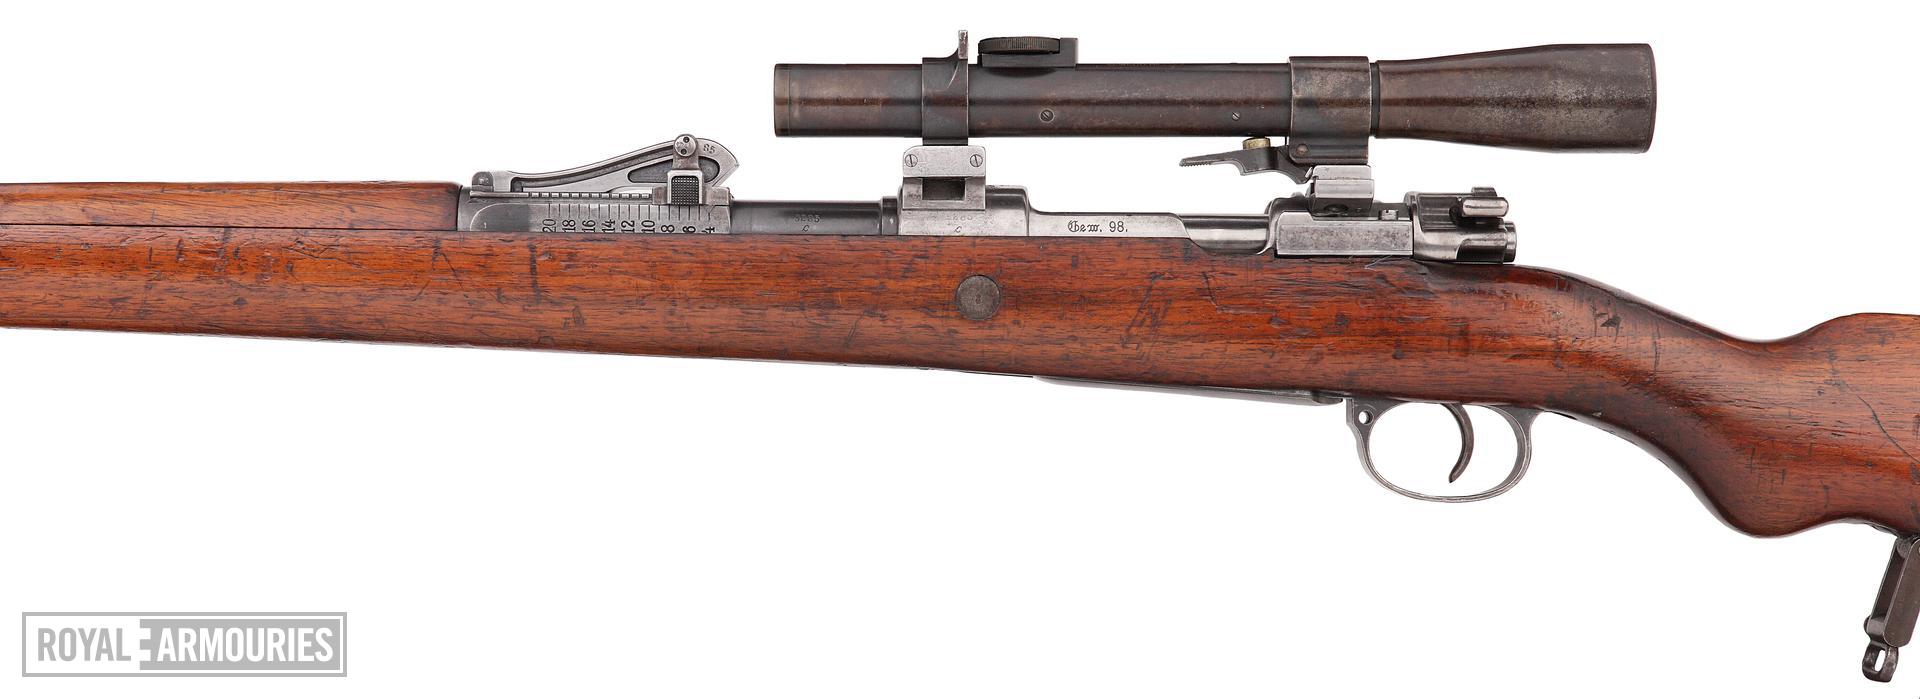
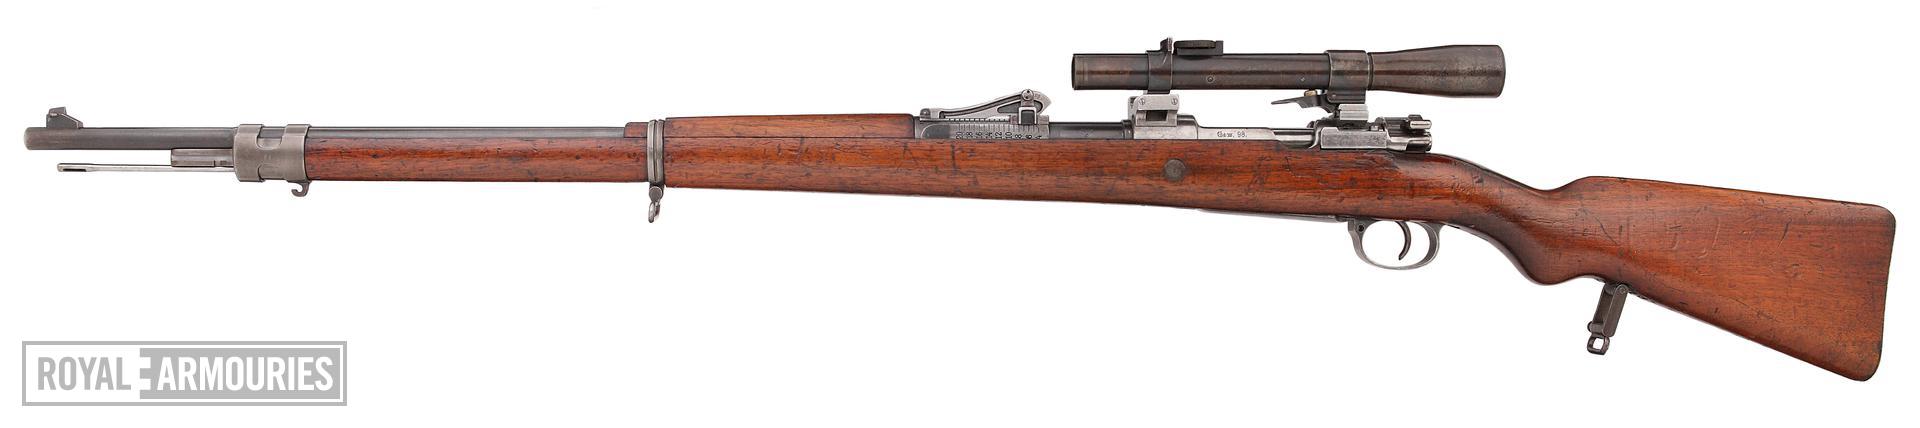
Weapons of War: Infantry
The Passchendaele Society would like to thank the Royal Armouries in Leeds, England for providing the following images. World War 1 represented many things but foremost among them was innovation. Since the dawn of time, man has always sought to find better ways to create destruction and World War 1 saw the frightening cost of mixing modern technology and outdated tactics. Please check out the full articles and collections for the following and other weapons at the Royal Armouries digital collections here: https://collections.royalarmouries.org/
The British Empire
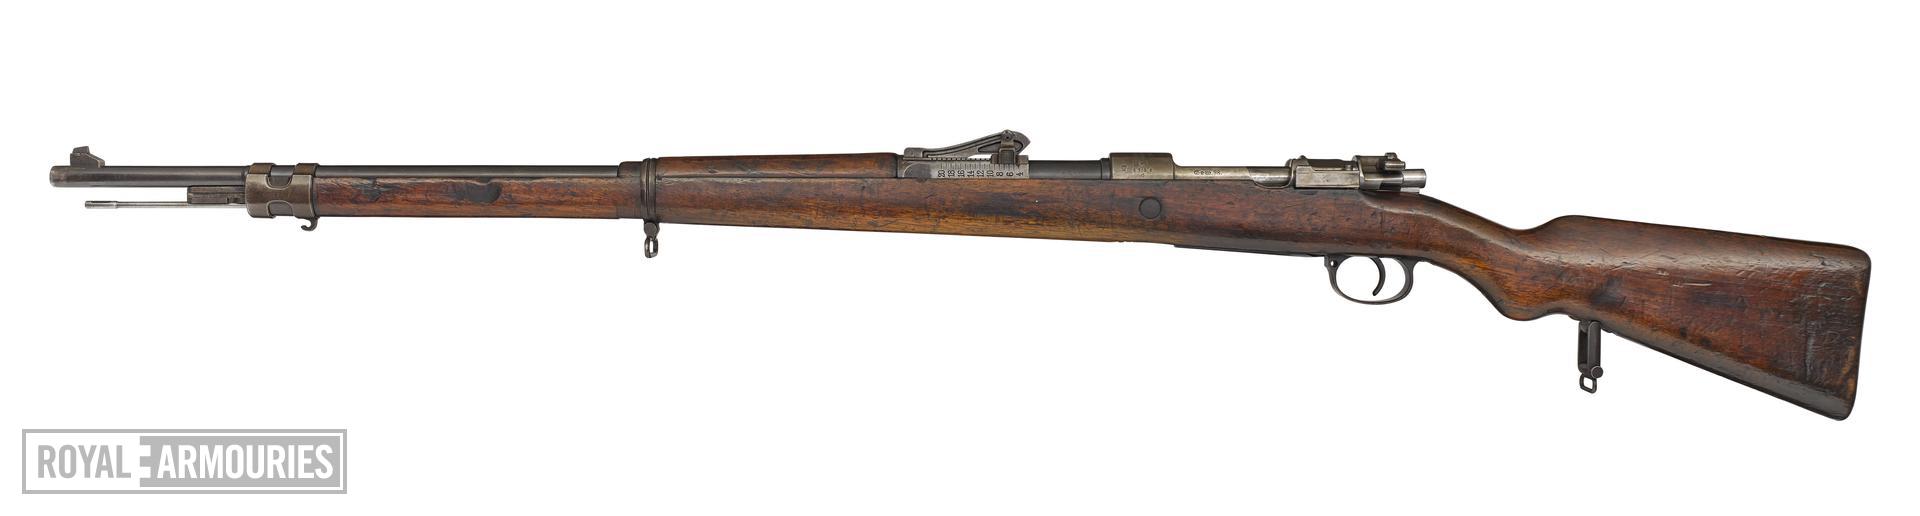
Short, Magazine Lee Enfield (SMLE) No1 MkIII
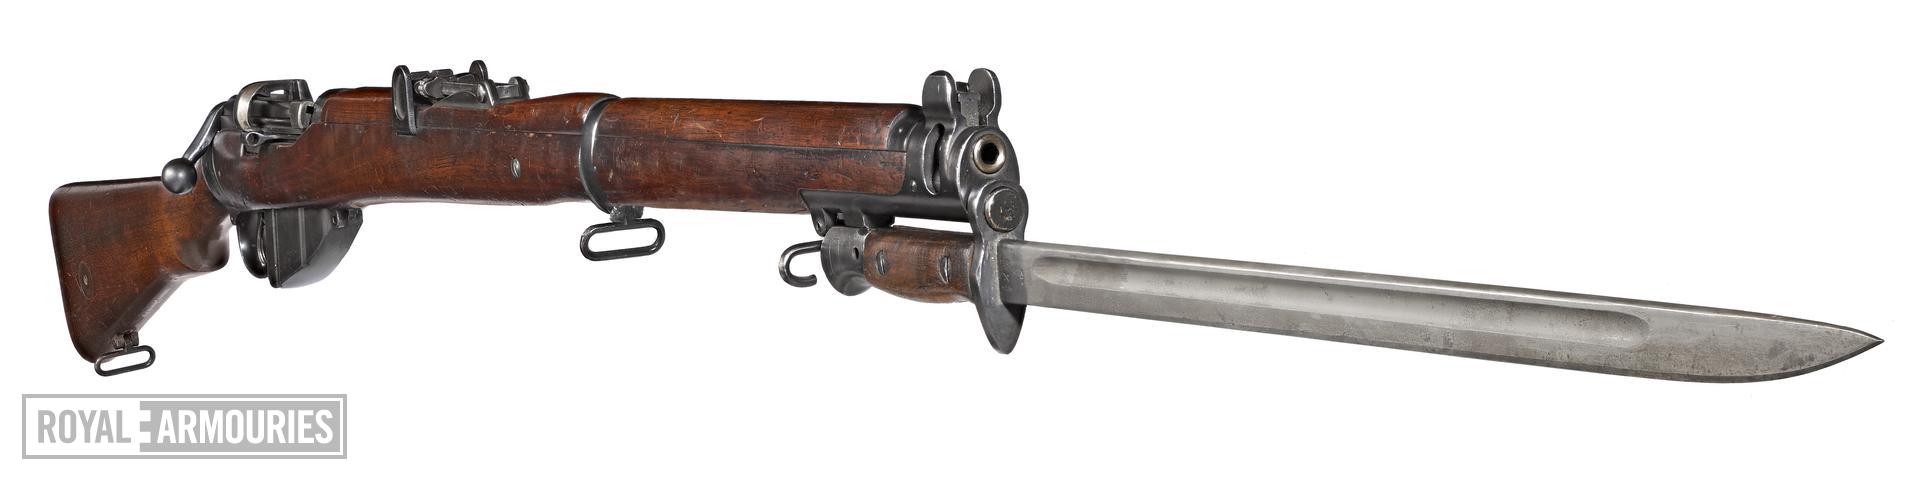
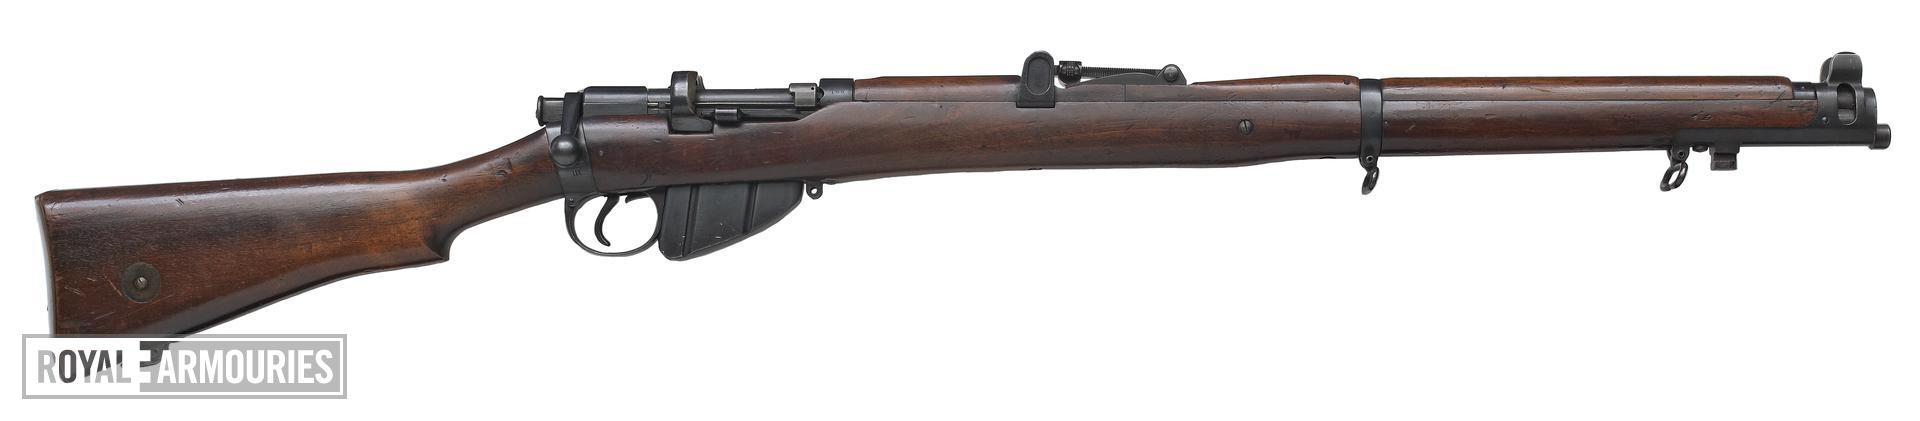
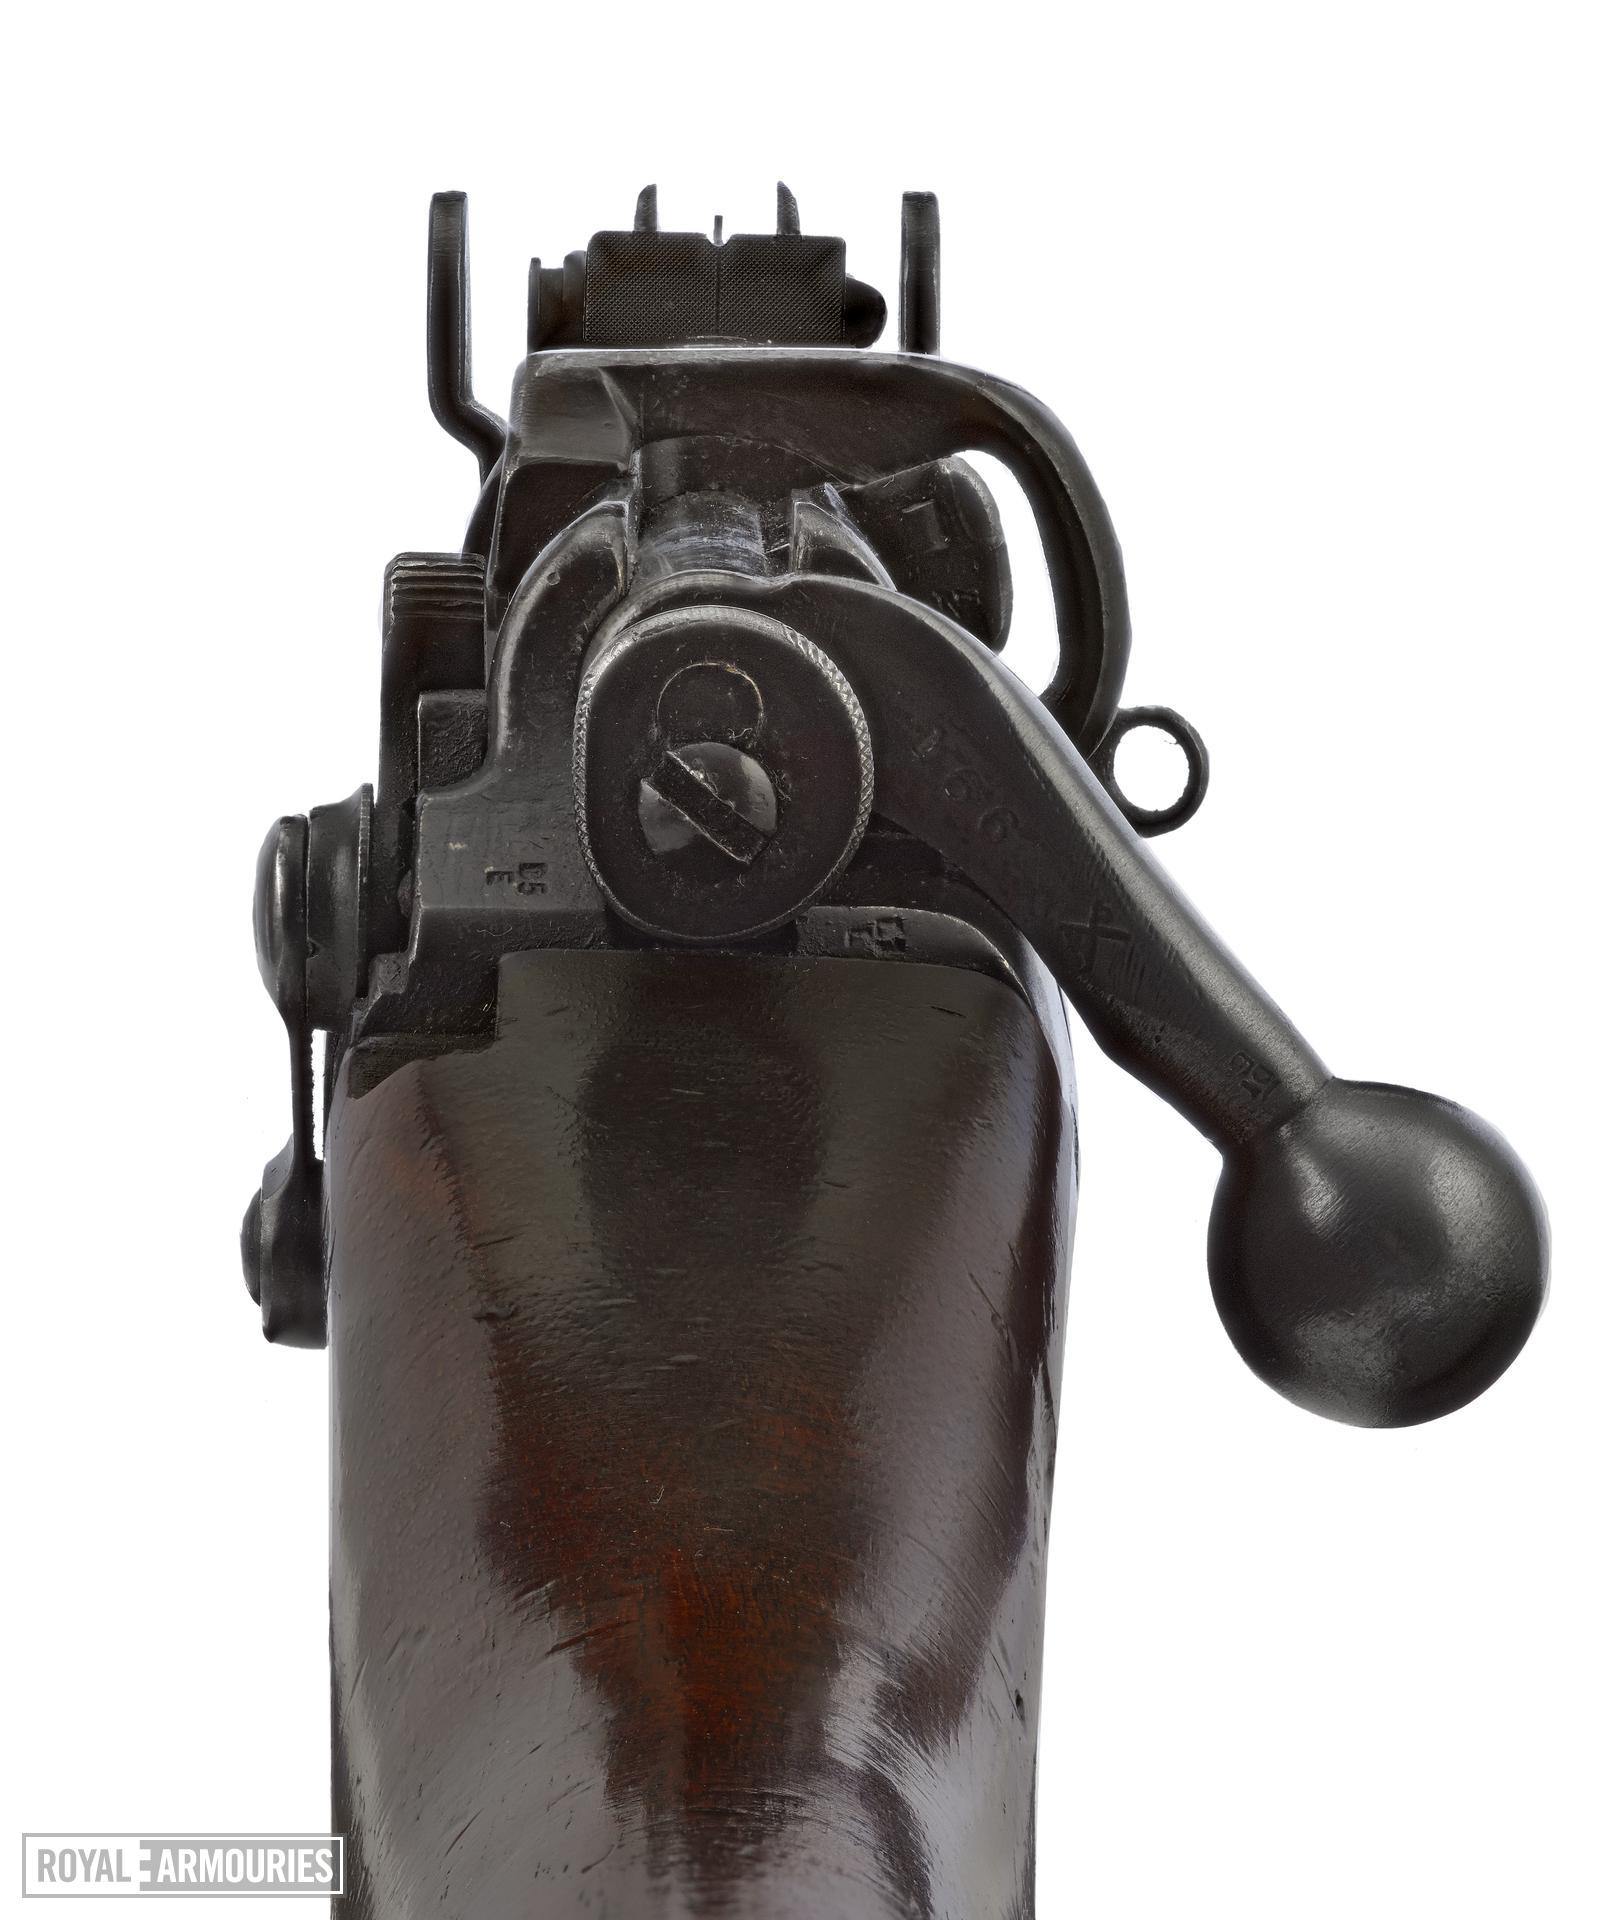
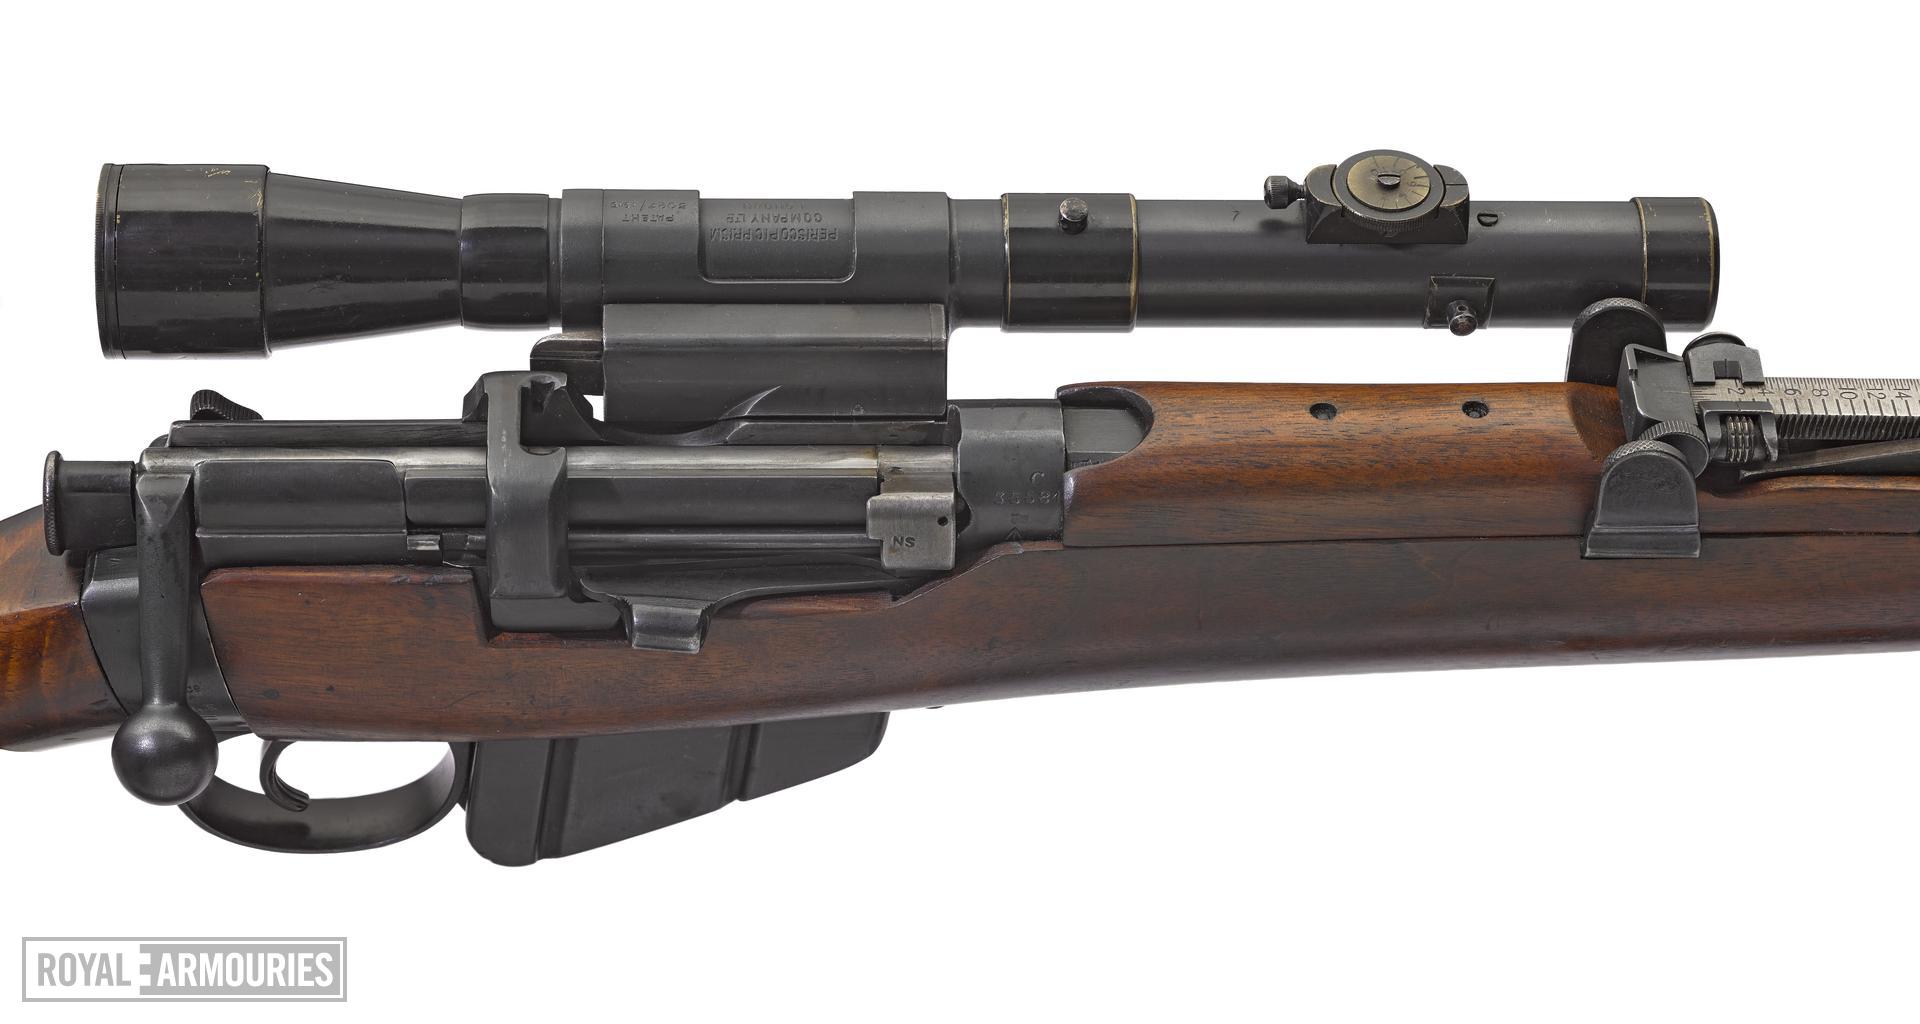
The standard issue rifle of all British Empire forces, including the ANZACs, this rifle represented the latest in weapons technology. Firing the stout .303 inch round and featuring a 10 round magazine, the Lee Enfield had double the ammunition with a much faster fire rate than the German Mauser, thanks to a short and speedy bolt mechanism. The rifle was loaded via chargers which held five rounds each, enabling the soldier to reload his rifle quickly – a lesson learned from the Boer War. During the Battle of Mons in 1914, several German infantry accounts reported being fired on by machine guns when really, they were only facing a trained British force armed with this rife, potentially performing a technique called the, 'Mad Minute,' which allows a rifleman to shoot faster. In 1916, a number of variations of the rifle were equipped with scopes for use by snipers, these scopes were often mounted off-set to the side in order to enable the continued use of chargers. Sniper rifles were not common weapons and while any soldier could be deadly over a distance, World War 1 demonstrated that the combination of a rifle, scope and concealment; were a deadly combination.
Learn more about this historically significant and symbolic rifle in this book (free download) available online here (hyperlink, click on title): ‘The Lee Enfield Rifle’ by Major E.G.B Reynolds.
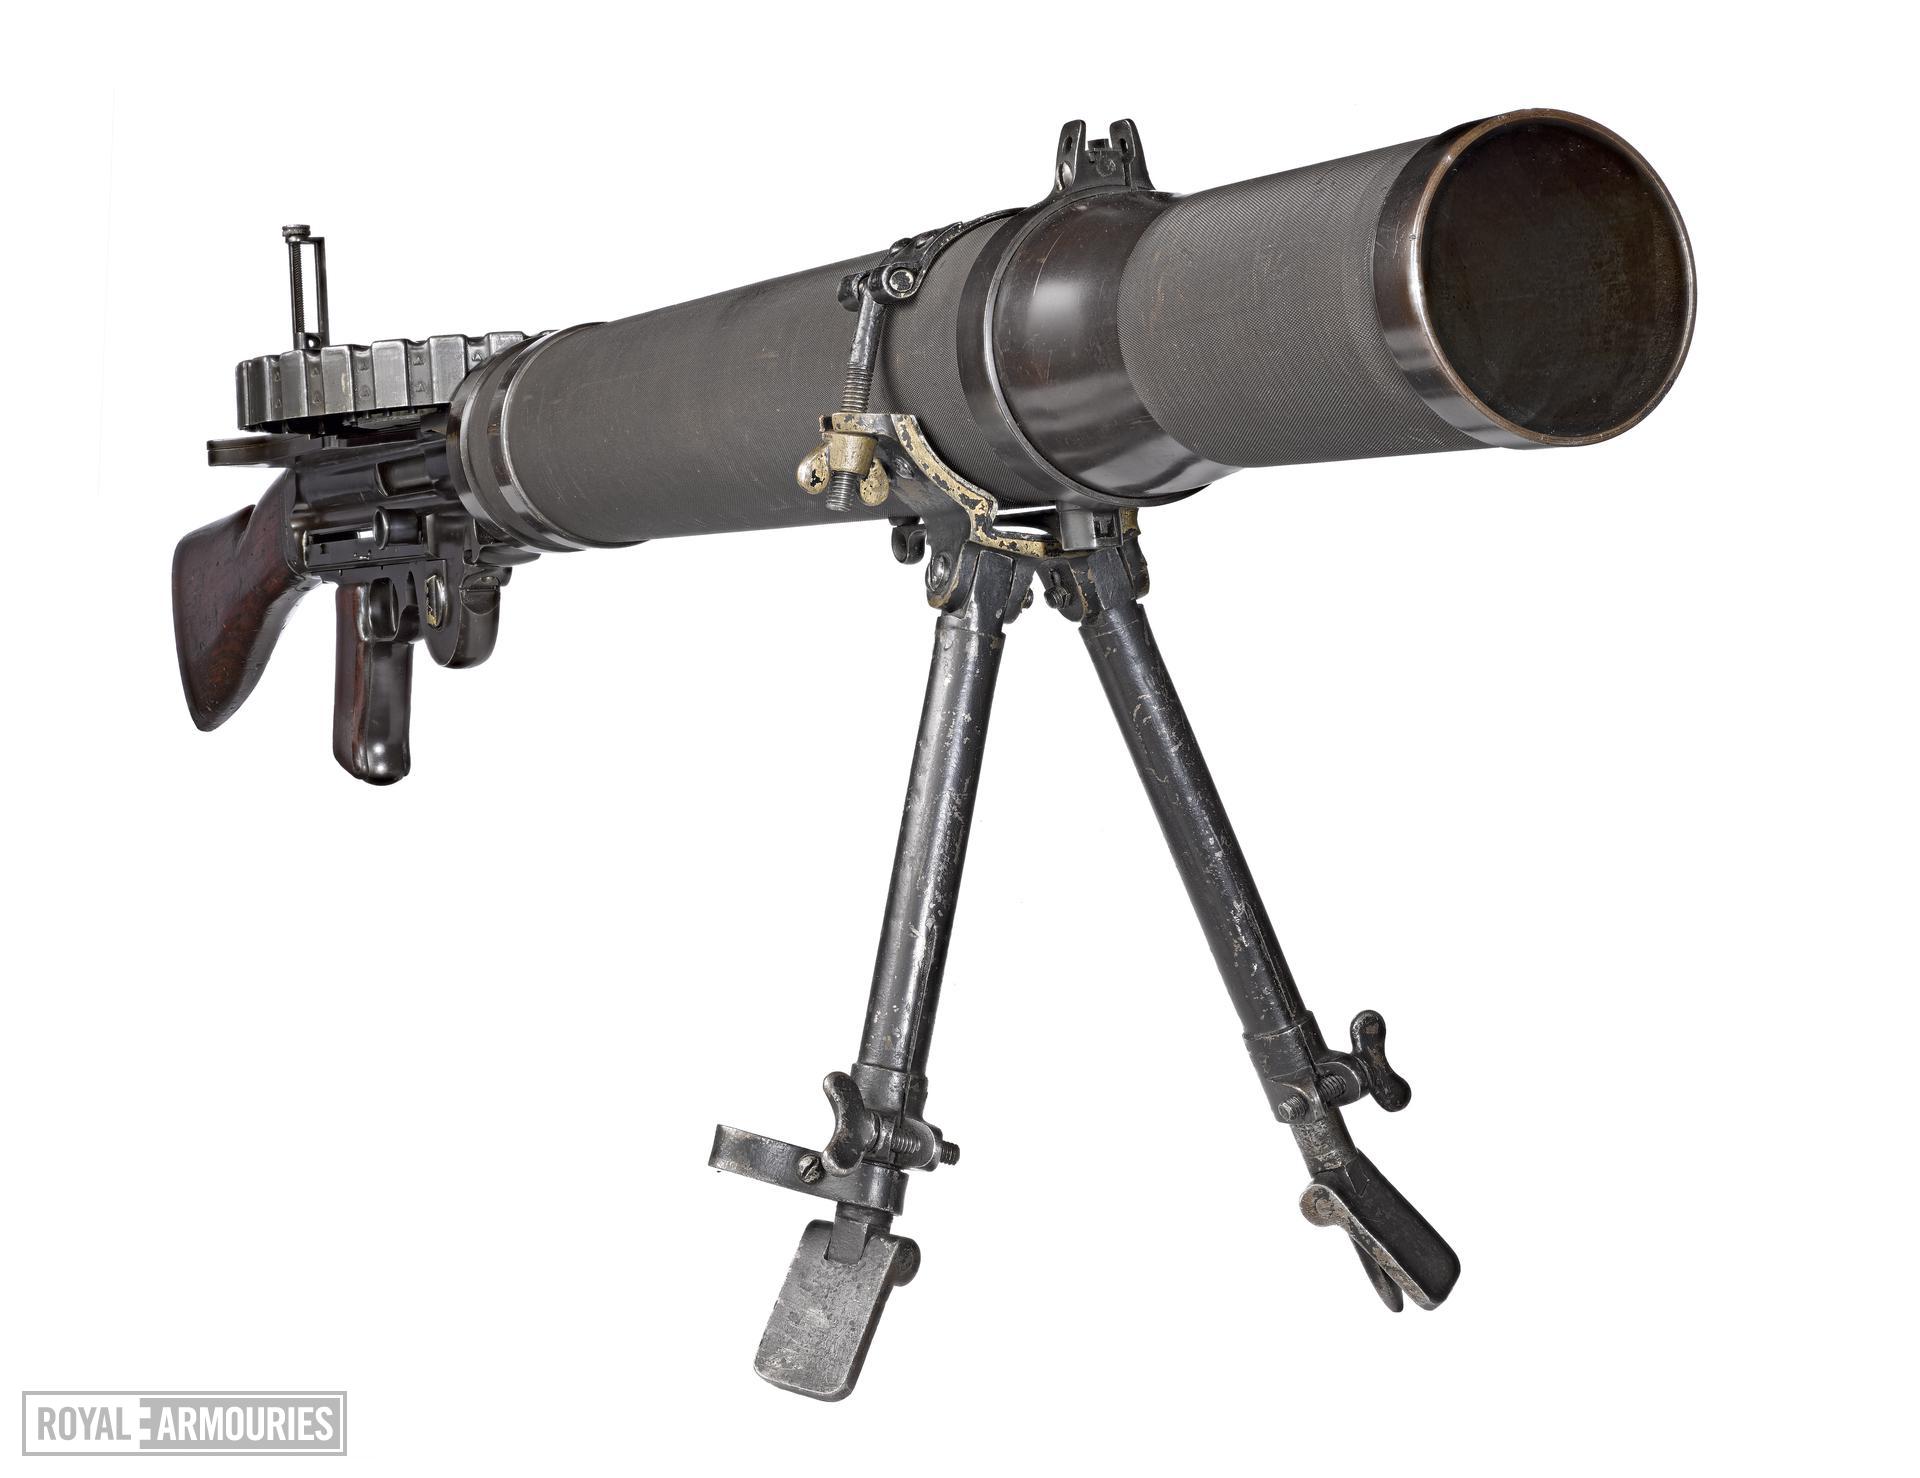
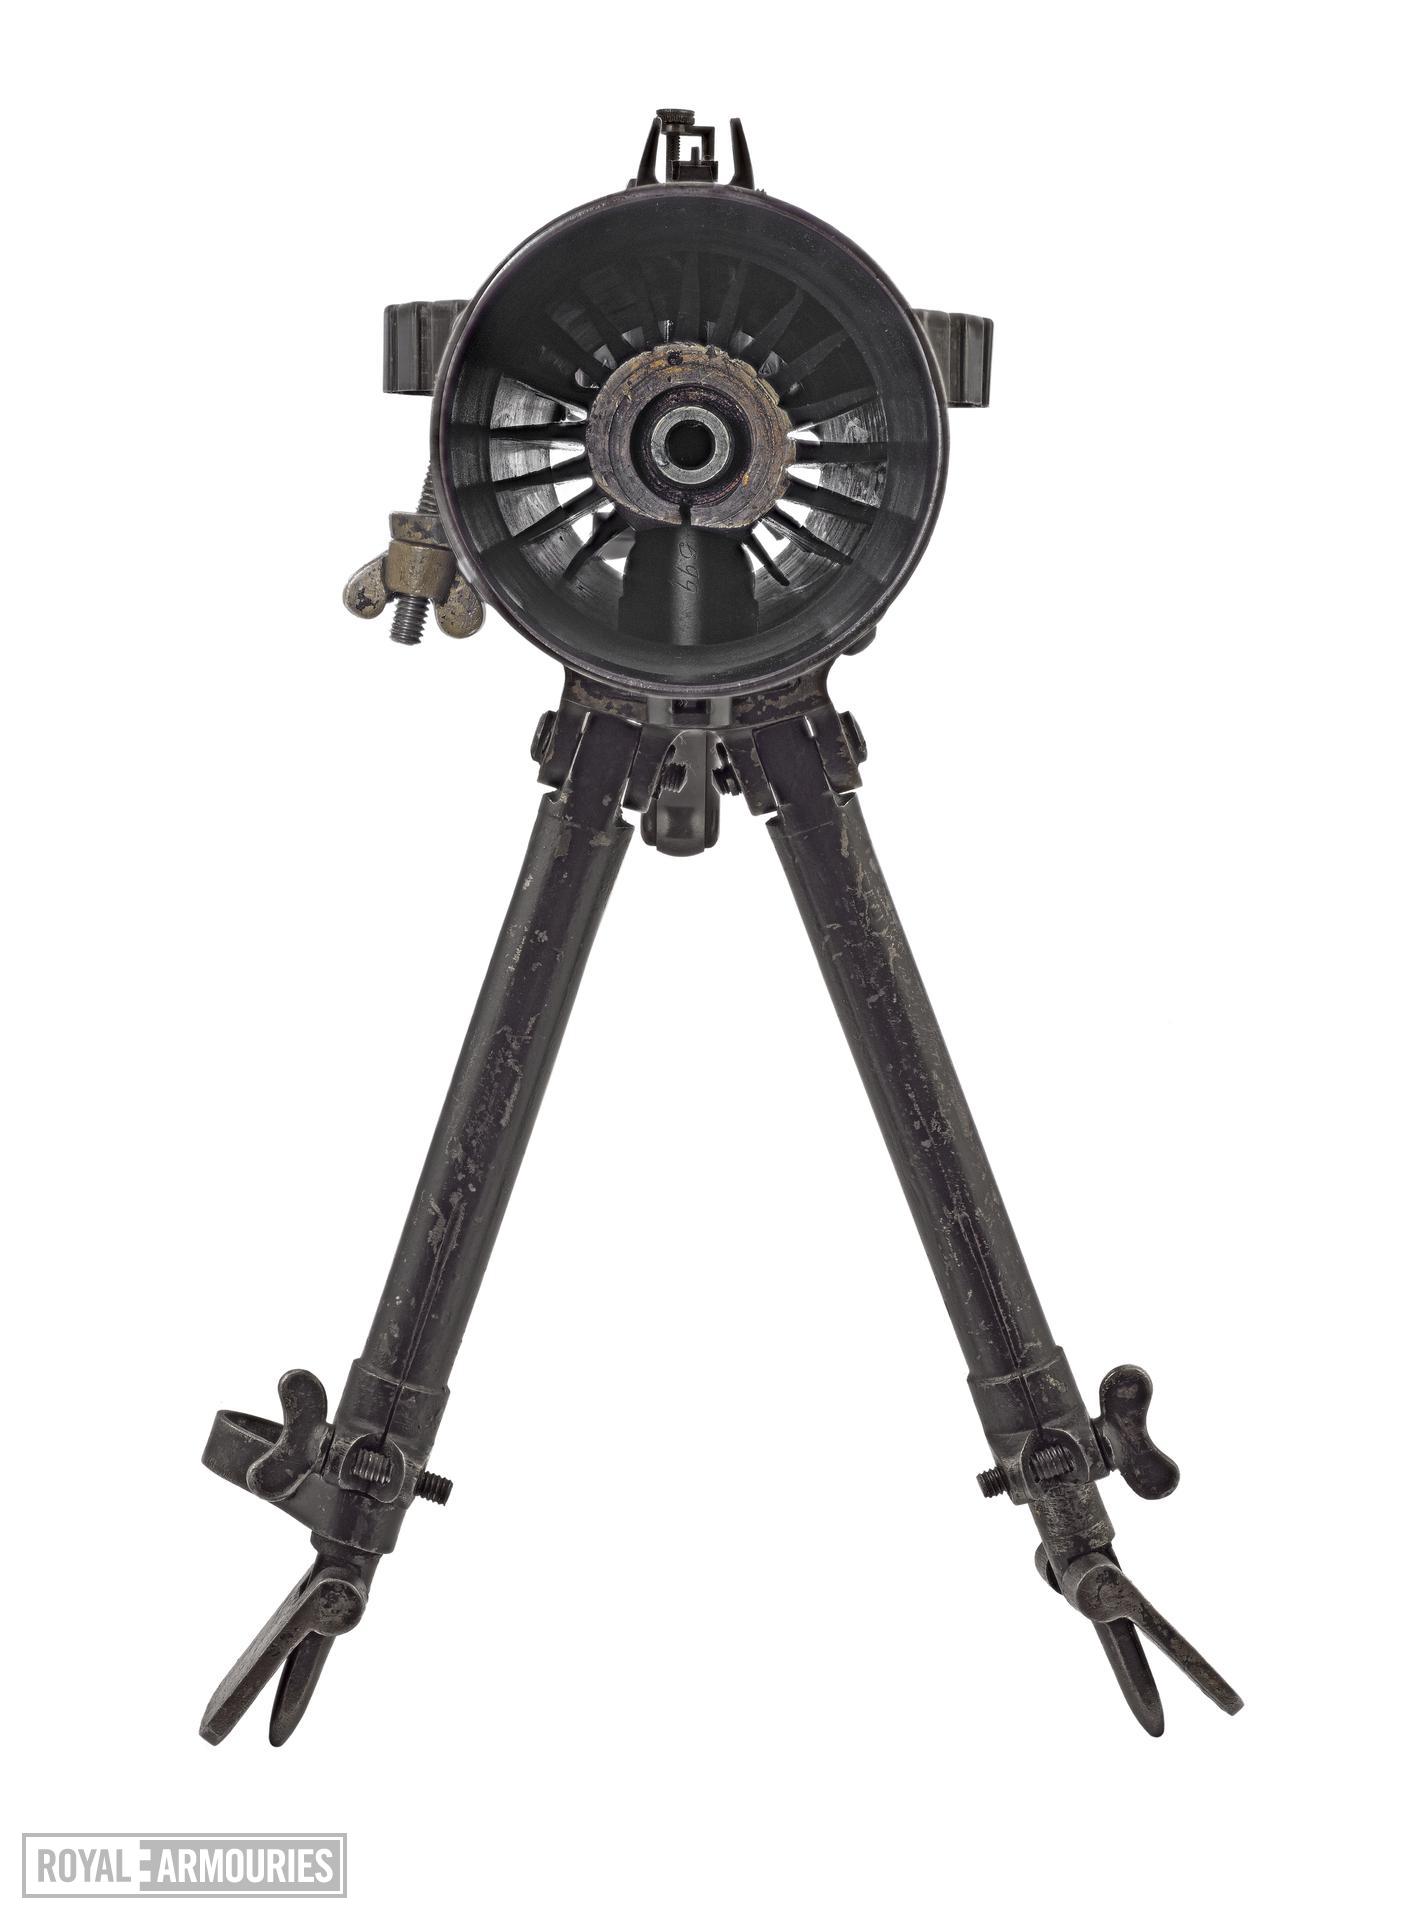
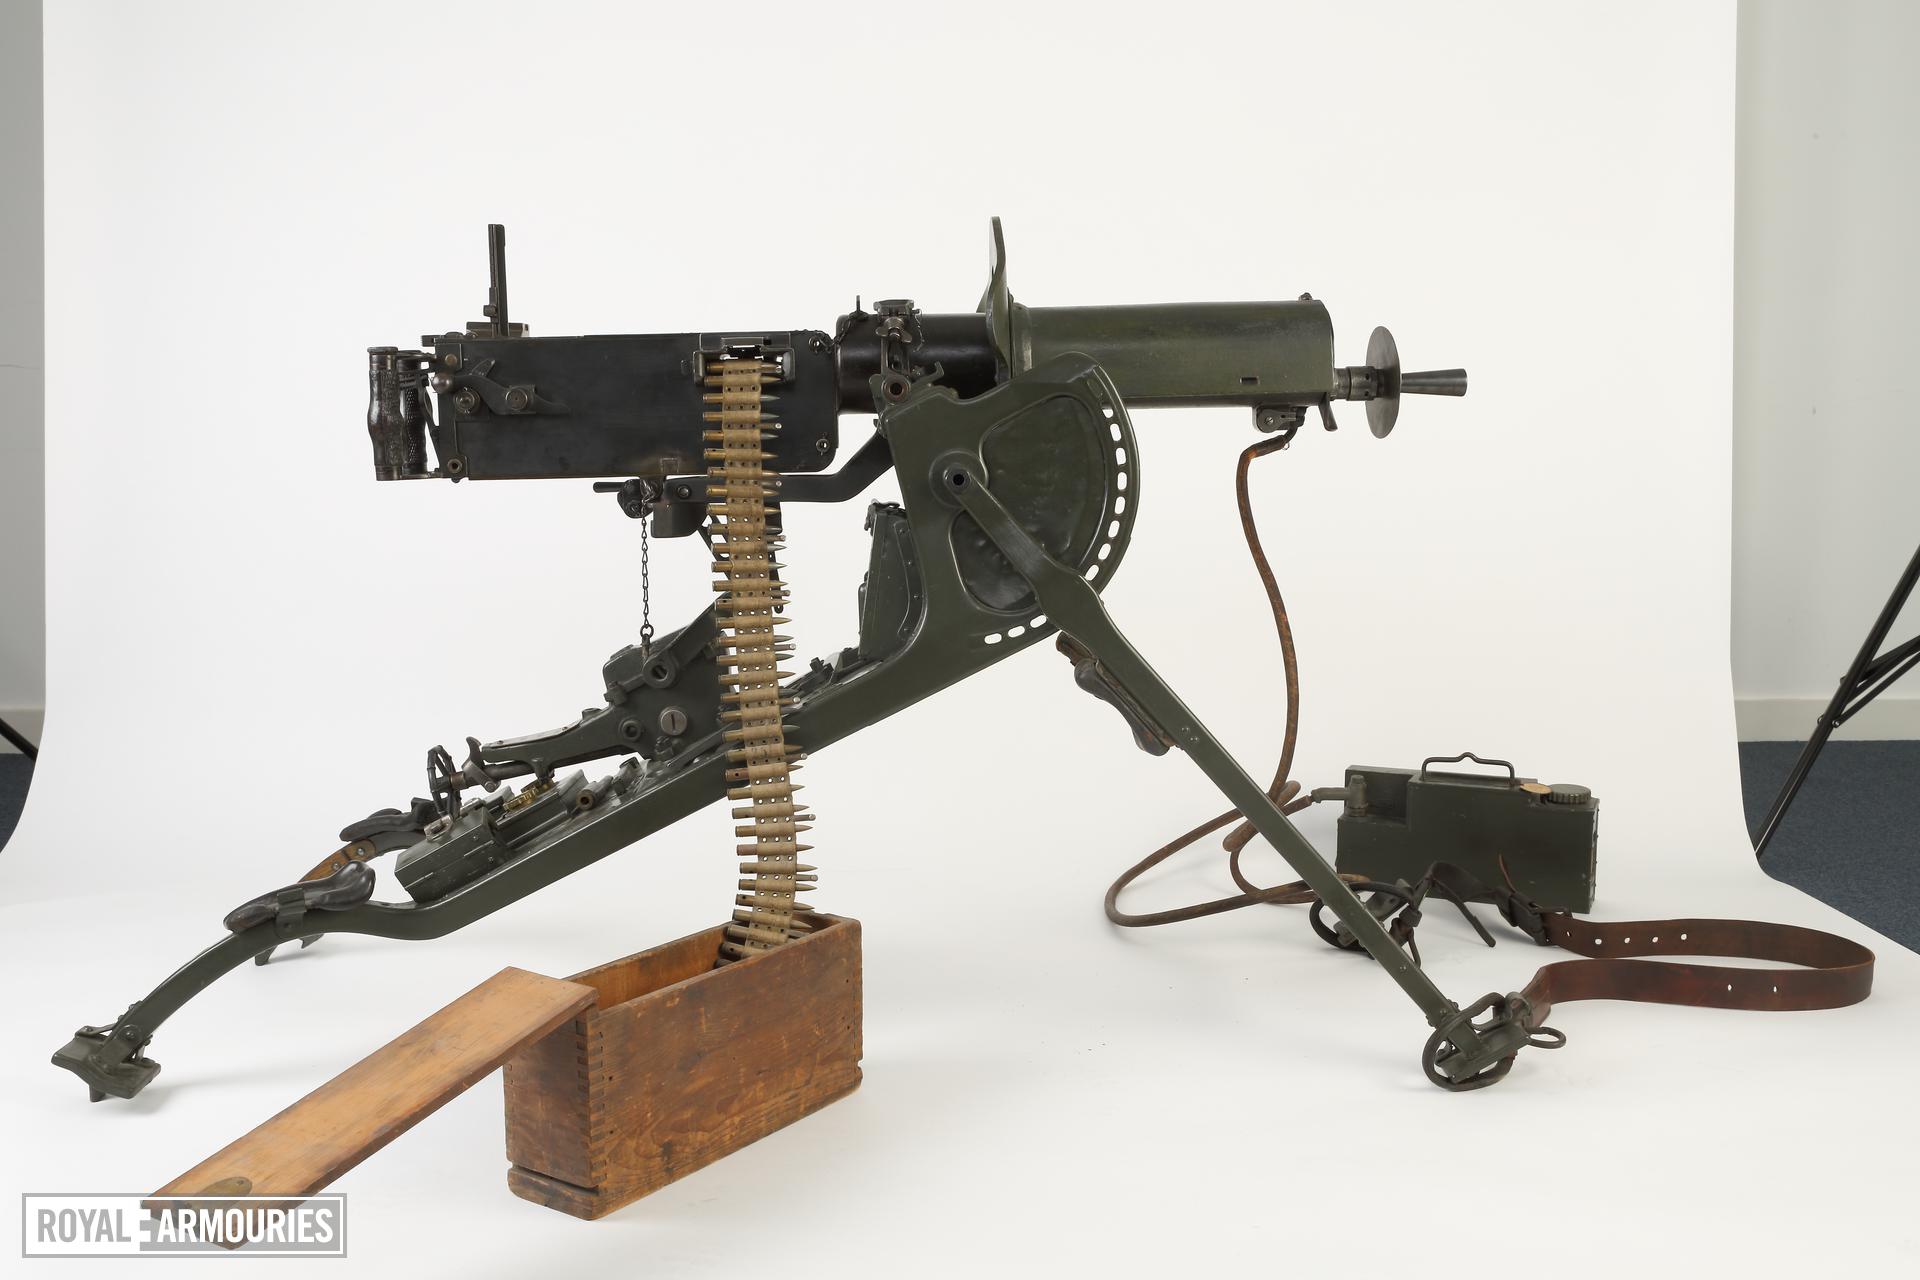
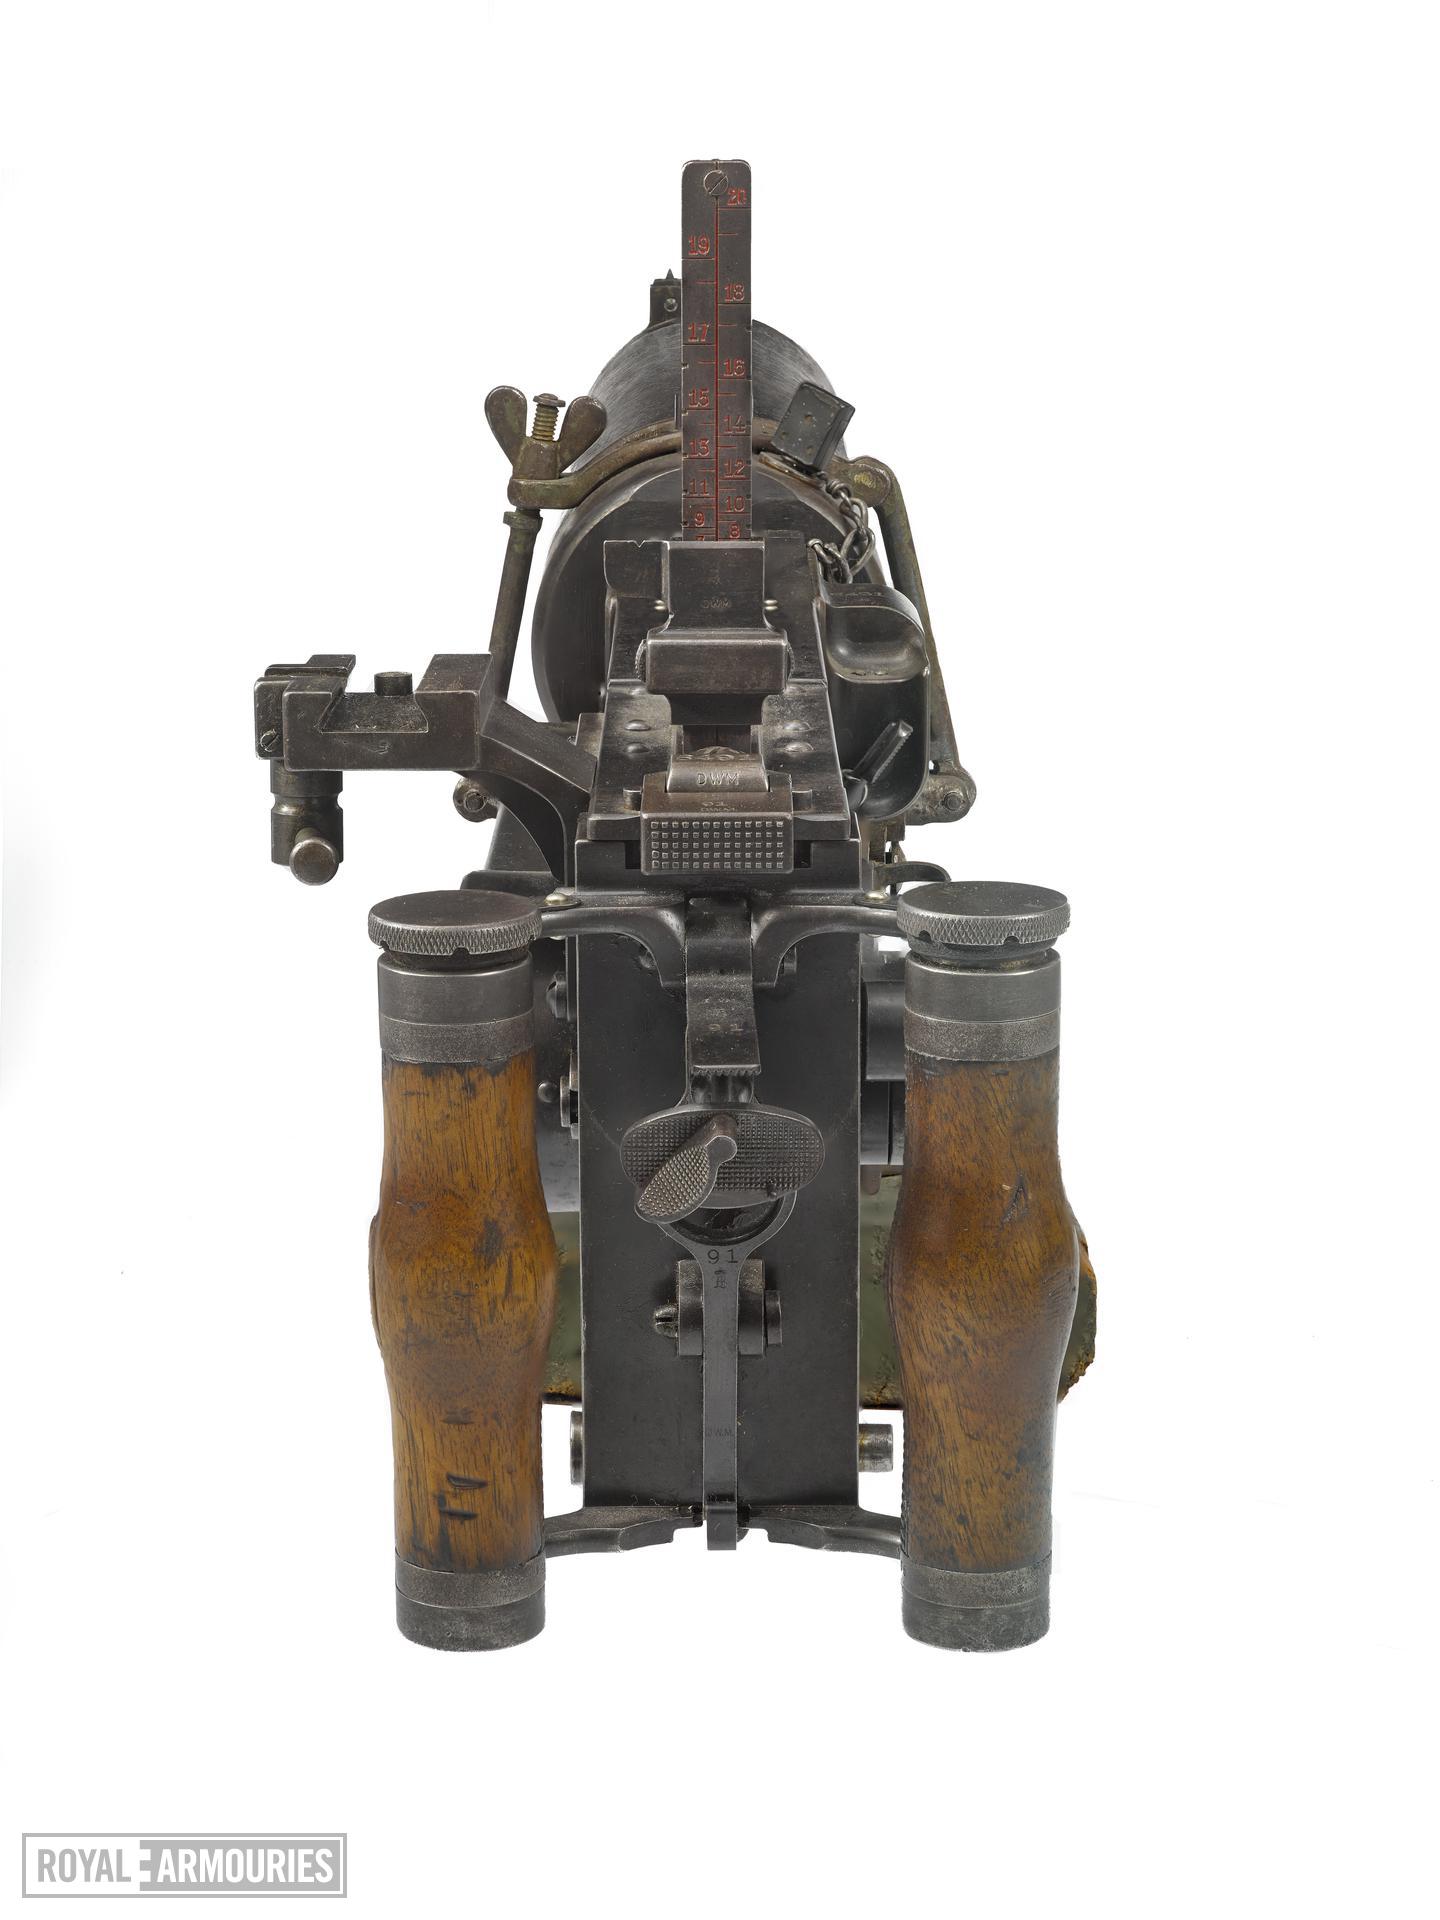
Vickers Gun
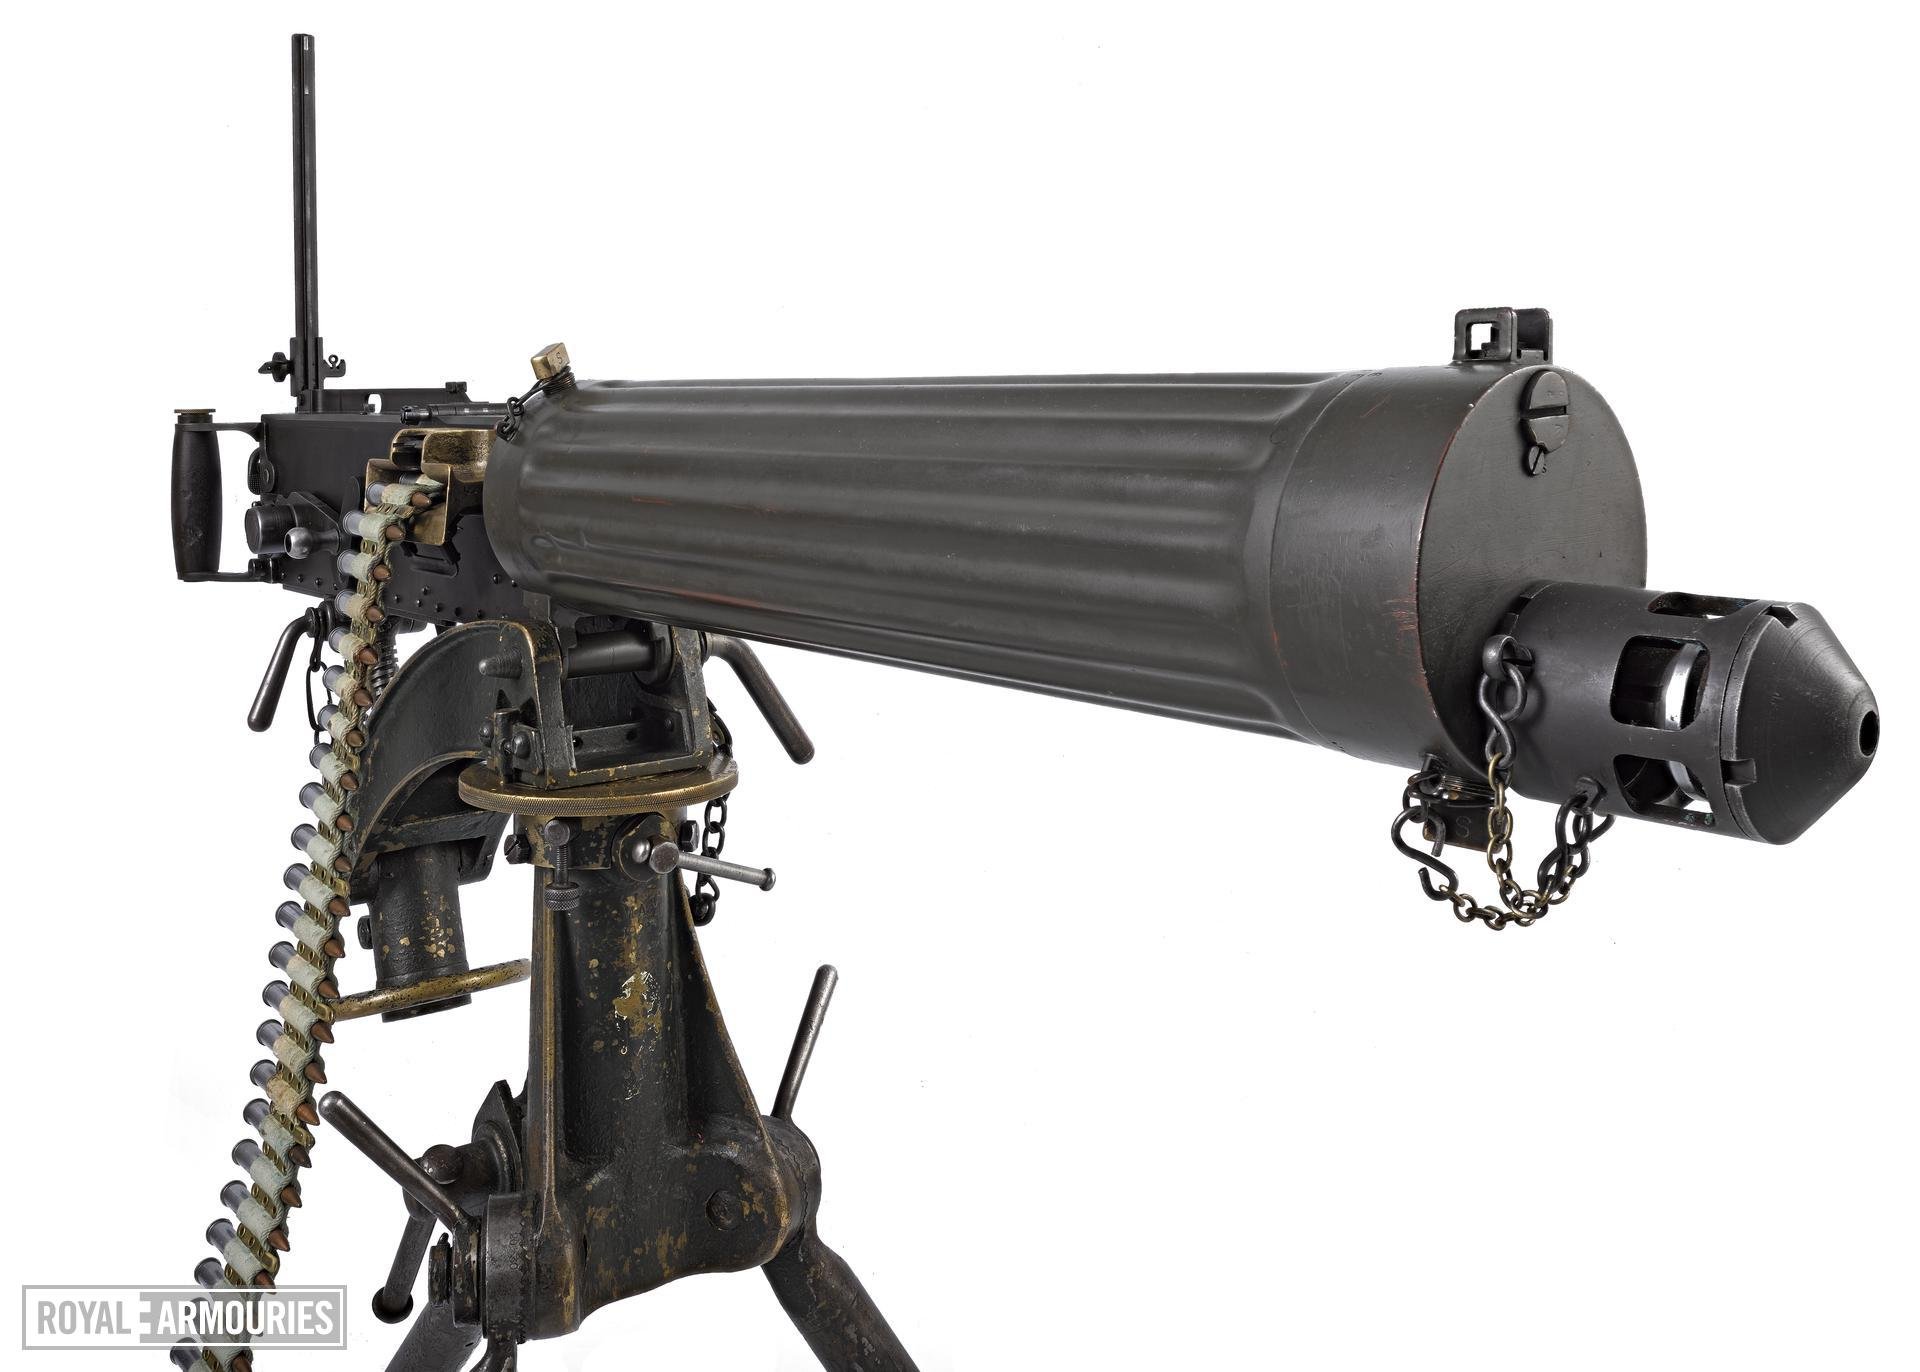
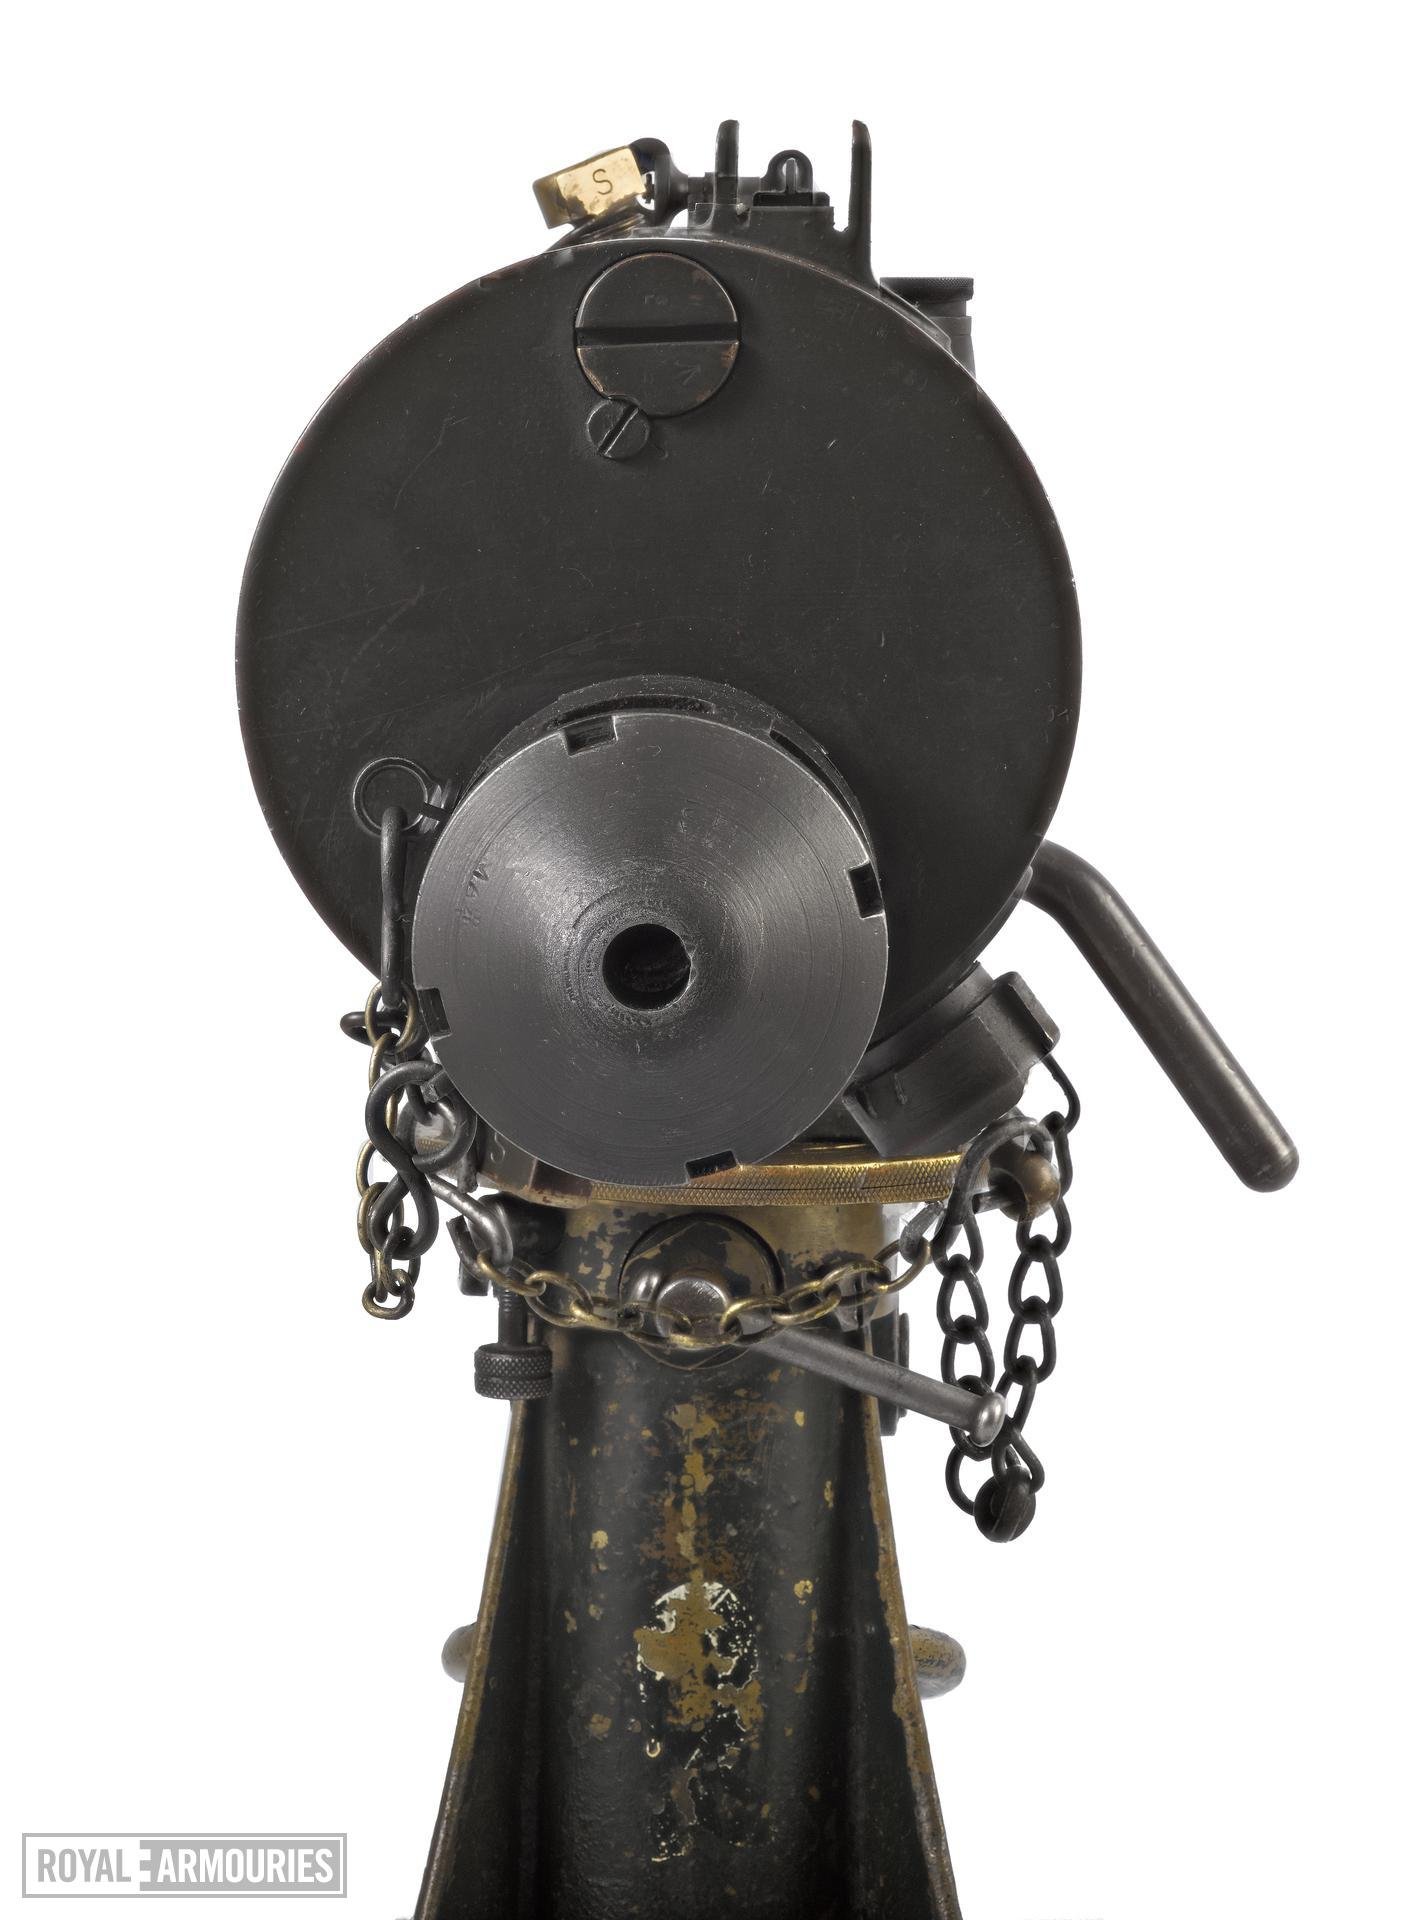
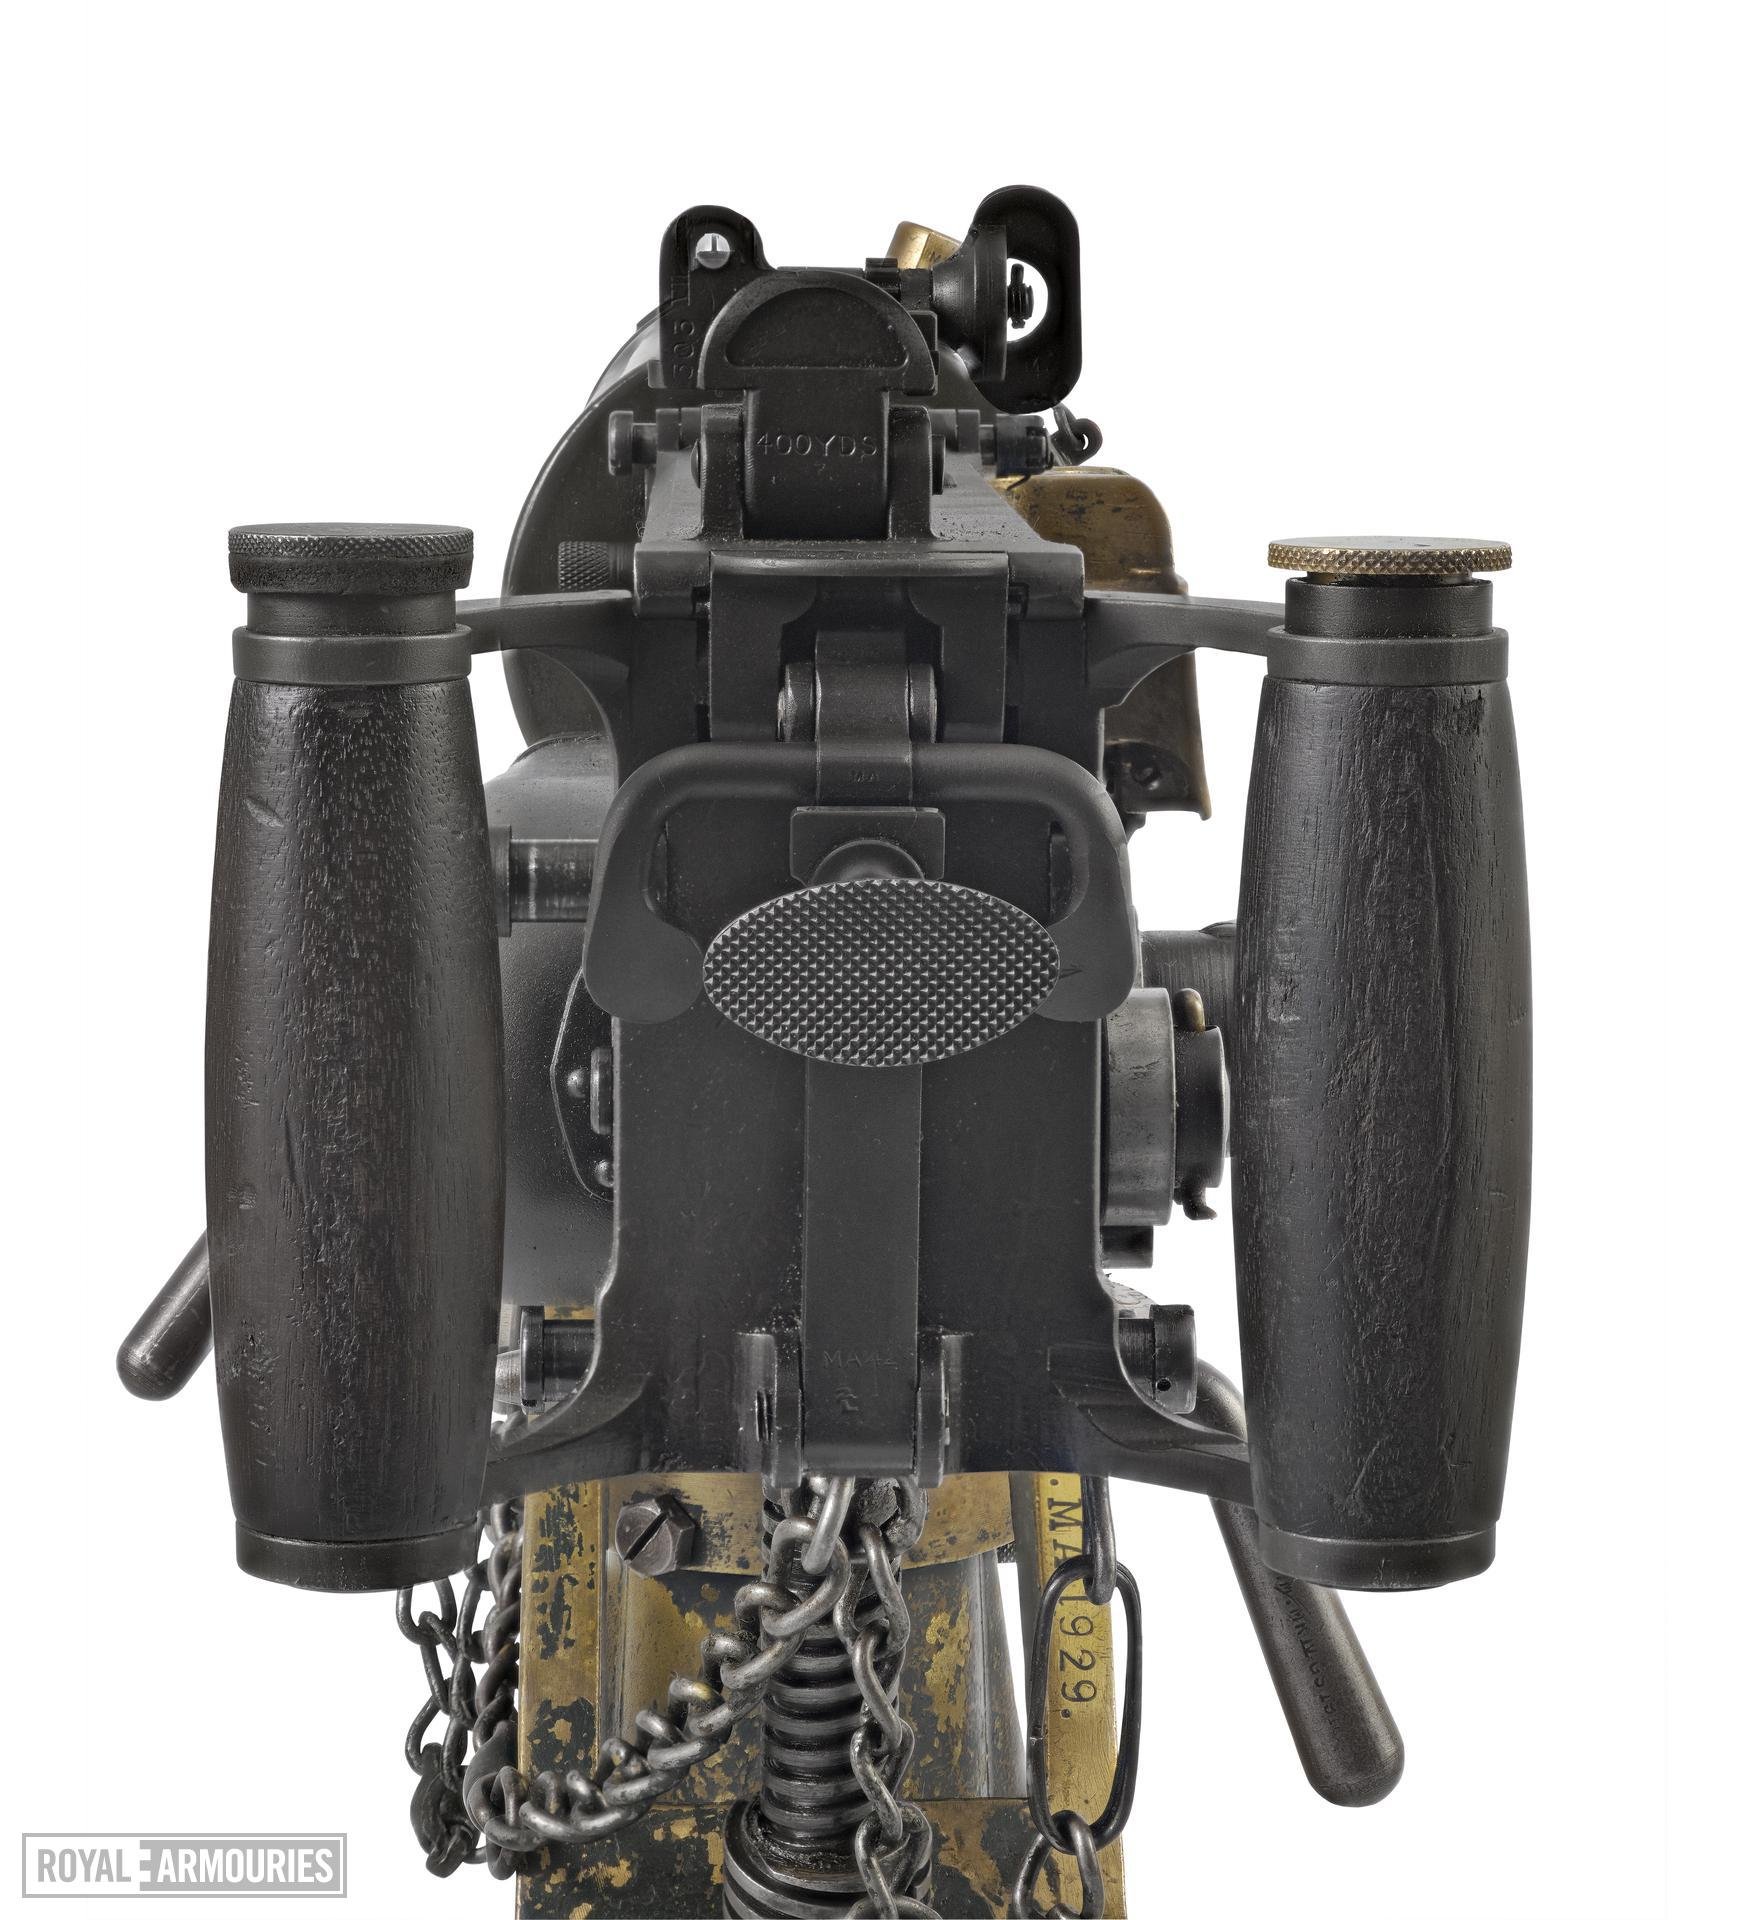
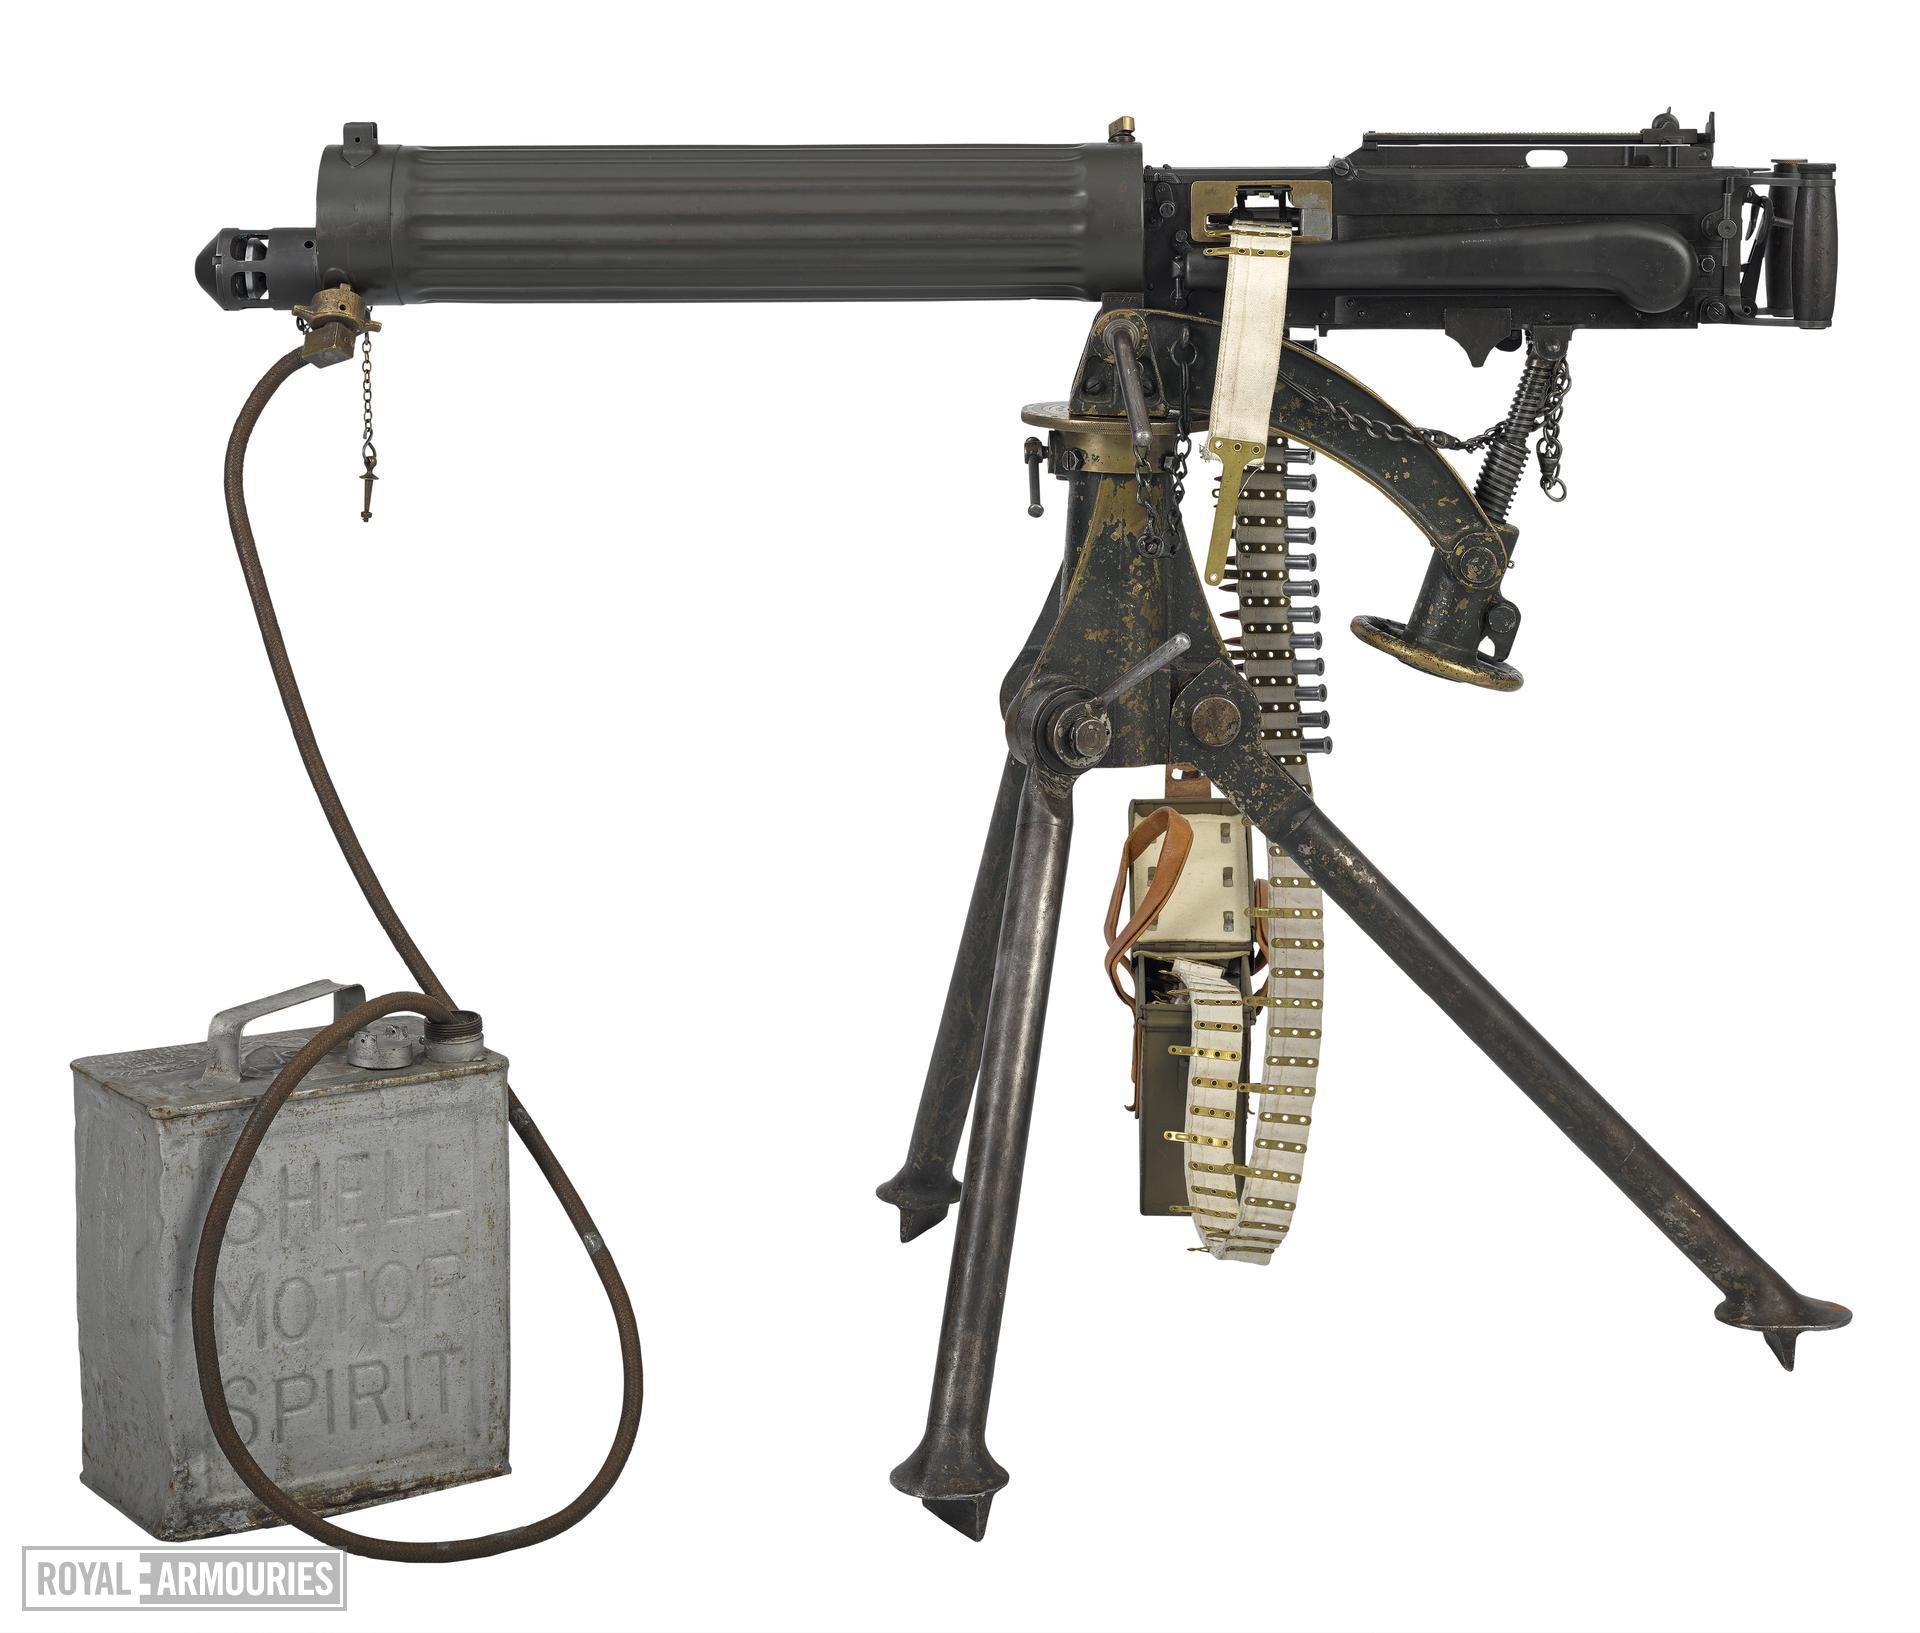
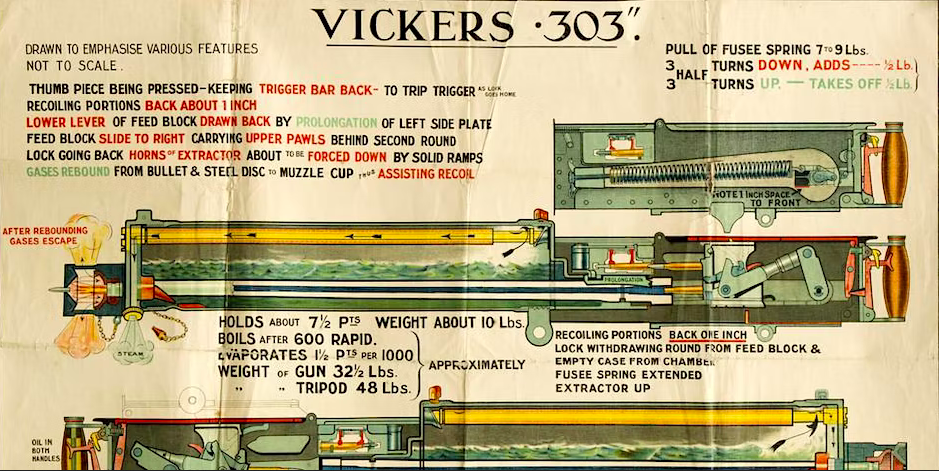
Perhaps the defining feature of the First World War battlefield, the Vickers machine gun has a legendary reputation for reliability. There are documented occasions of the weapons firing tens of thousands of rounds in battle. The Vickers fired the British .303 cartridge from 250 round belts and was water cooled – enabling its use of an extended duration. Such is the Vickers gun’s iconic status, that it has more than a few myths and legends regarding its use. One surprisingly true story includes the use of urine to fill the cooling jacket when water ran low. Though, whether the British soldiers brewed tea with the hot water from the a recently fired gun (hopefully not one that was topped up with urine!) remains to be determined. You can read about these stories and many more here: <https://vickersmg.blog/in-use/myths/>.
The Vickers was foundational to the tactics used by the British at Passchendaele and you can read more about its use in Flanders Fields in ‘Field of Fire: The Vickers Machine Gun at the Battle of Passchendaele,’ by Richard Fisher (Cranfield University, 2017) available here: <https://www.researchgate.net/publication/323525111_Field_of_Fire_The_Vickers_Machine_Gun_at_the_Battle_of_Passchendaele>.

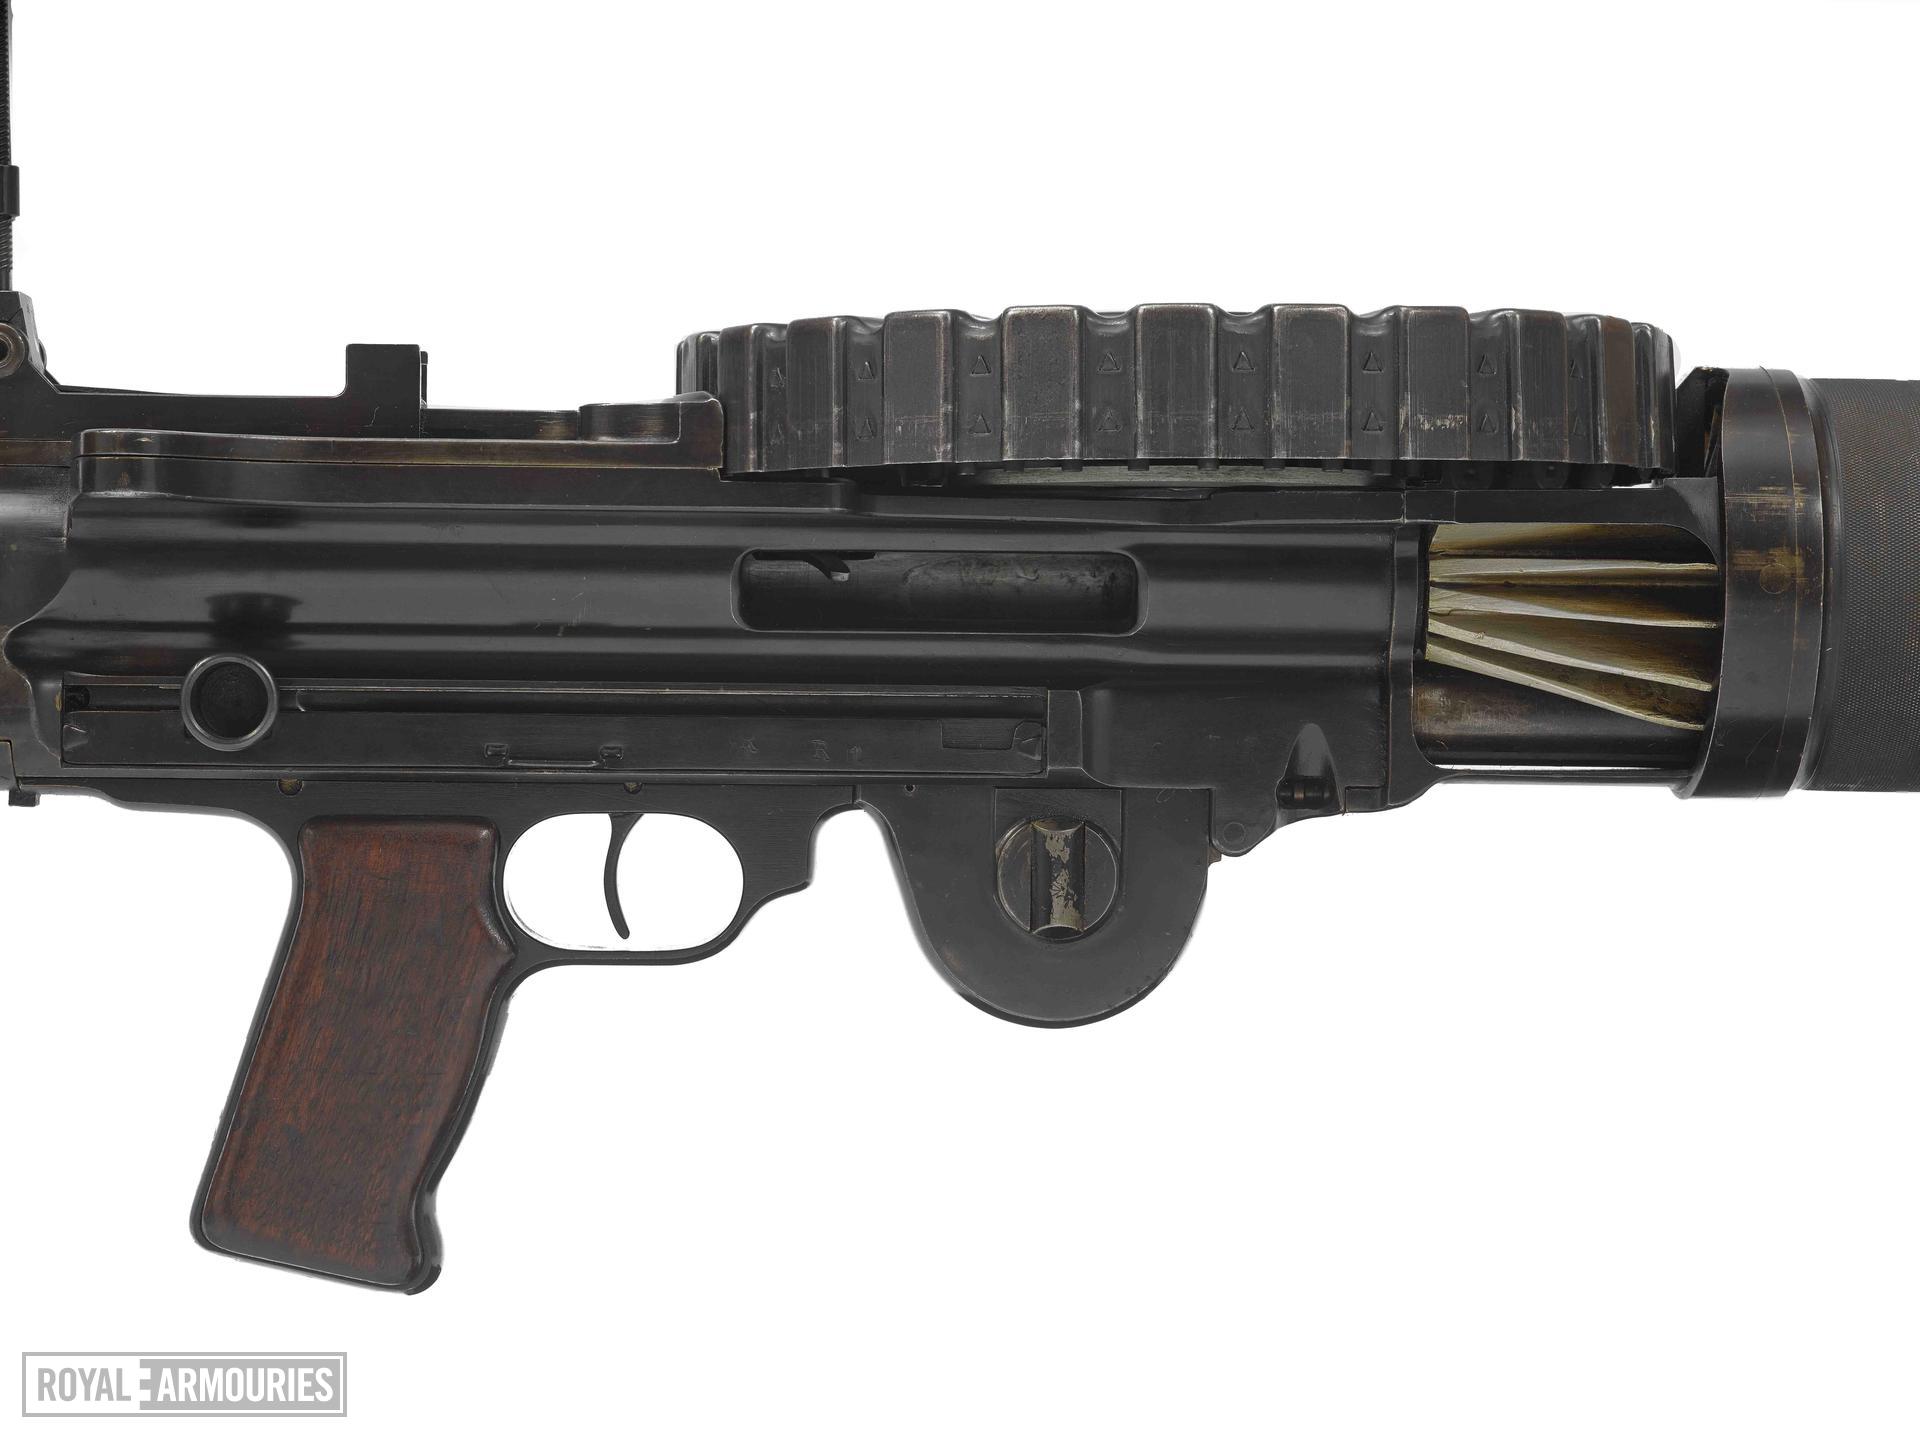

Lewis Gun
This light machine gun differed from the Vickers and MG08 guns as it was portable. While on the offensive, Lewisgunners would charge forward and set up forward positions taking advantage of this weapon's mobility. Designed by an American inventor, Isaac Newton Lewis, this weapon fired the same .303 round as the British Lee Enfield rifle and was air-cooled.
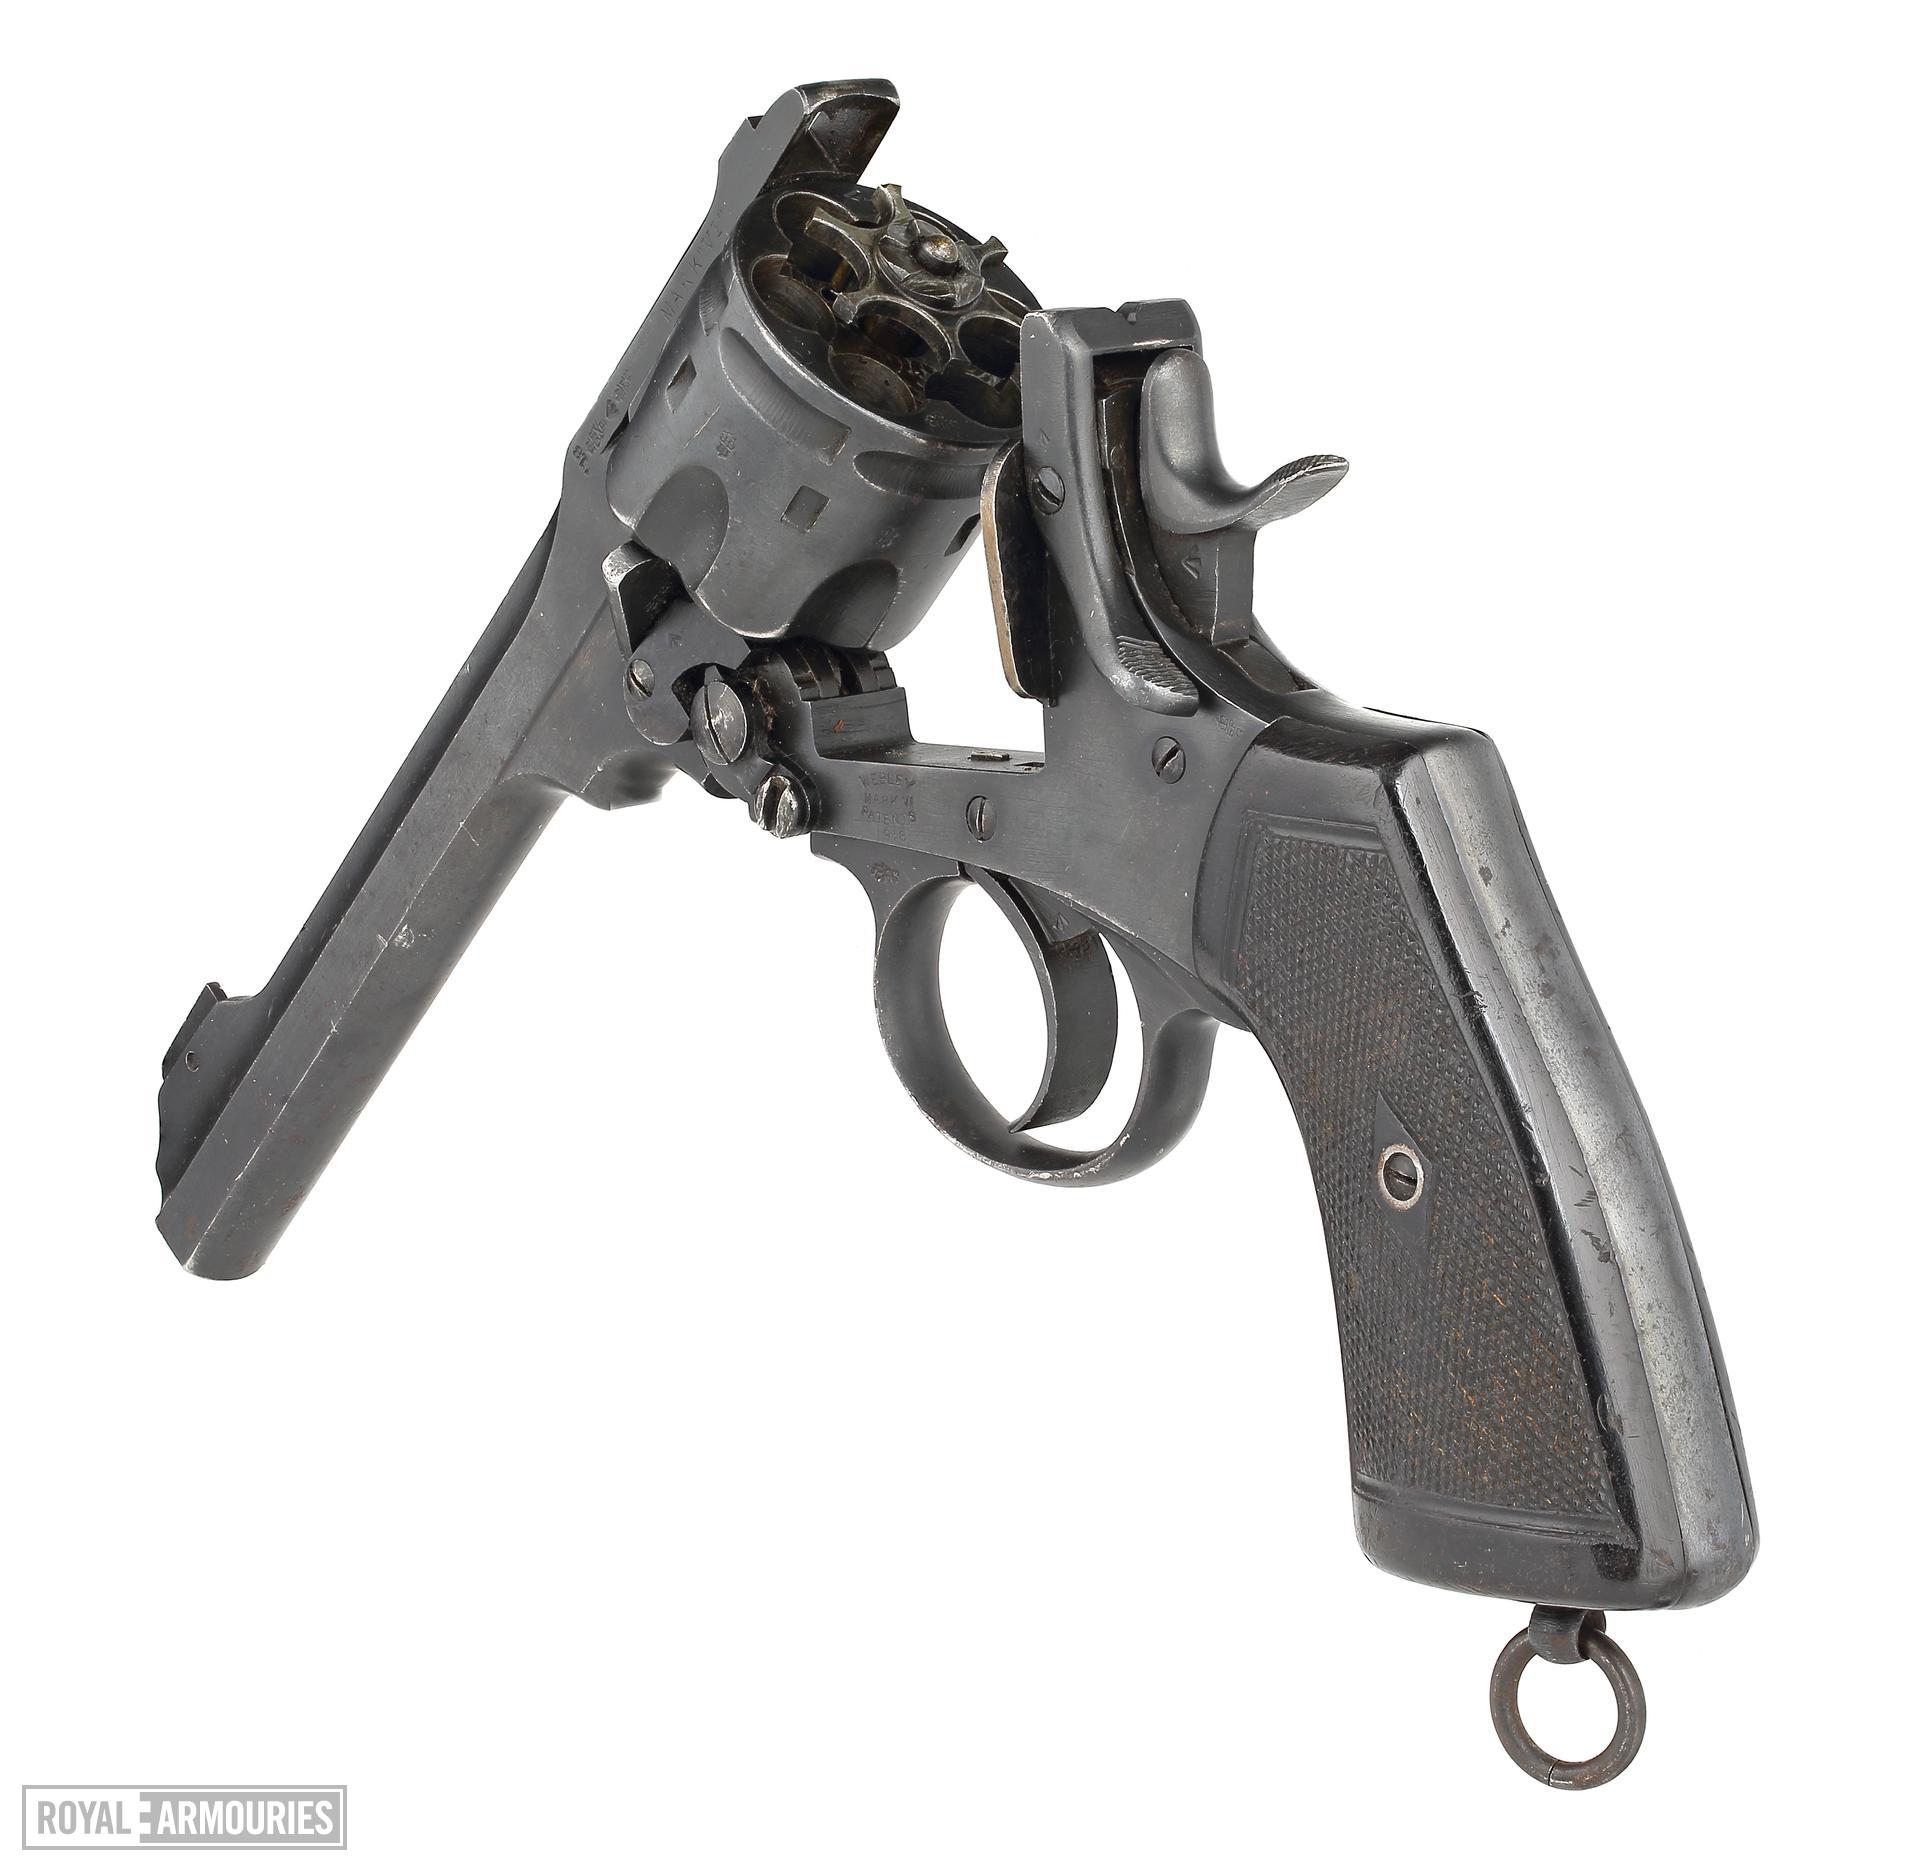
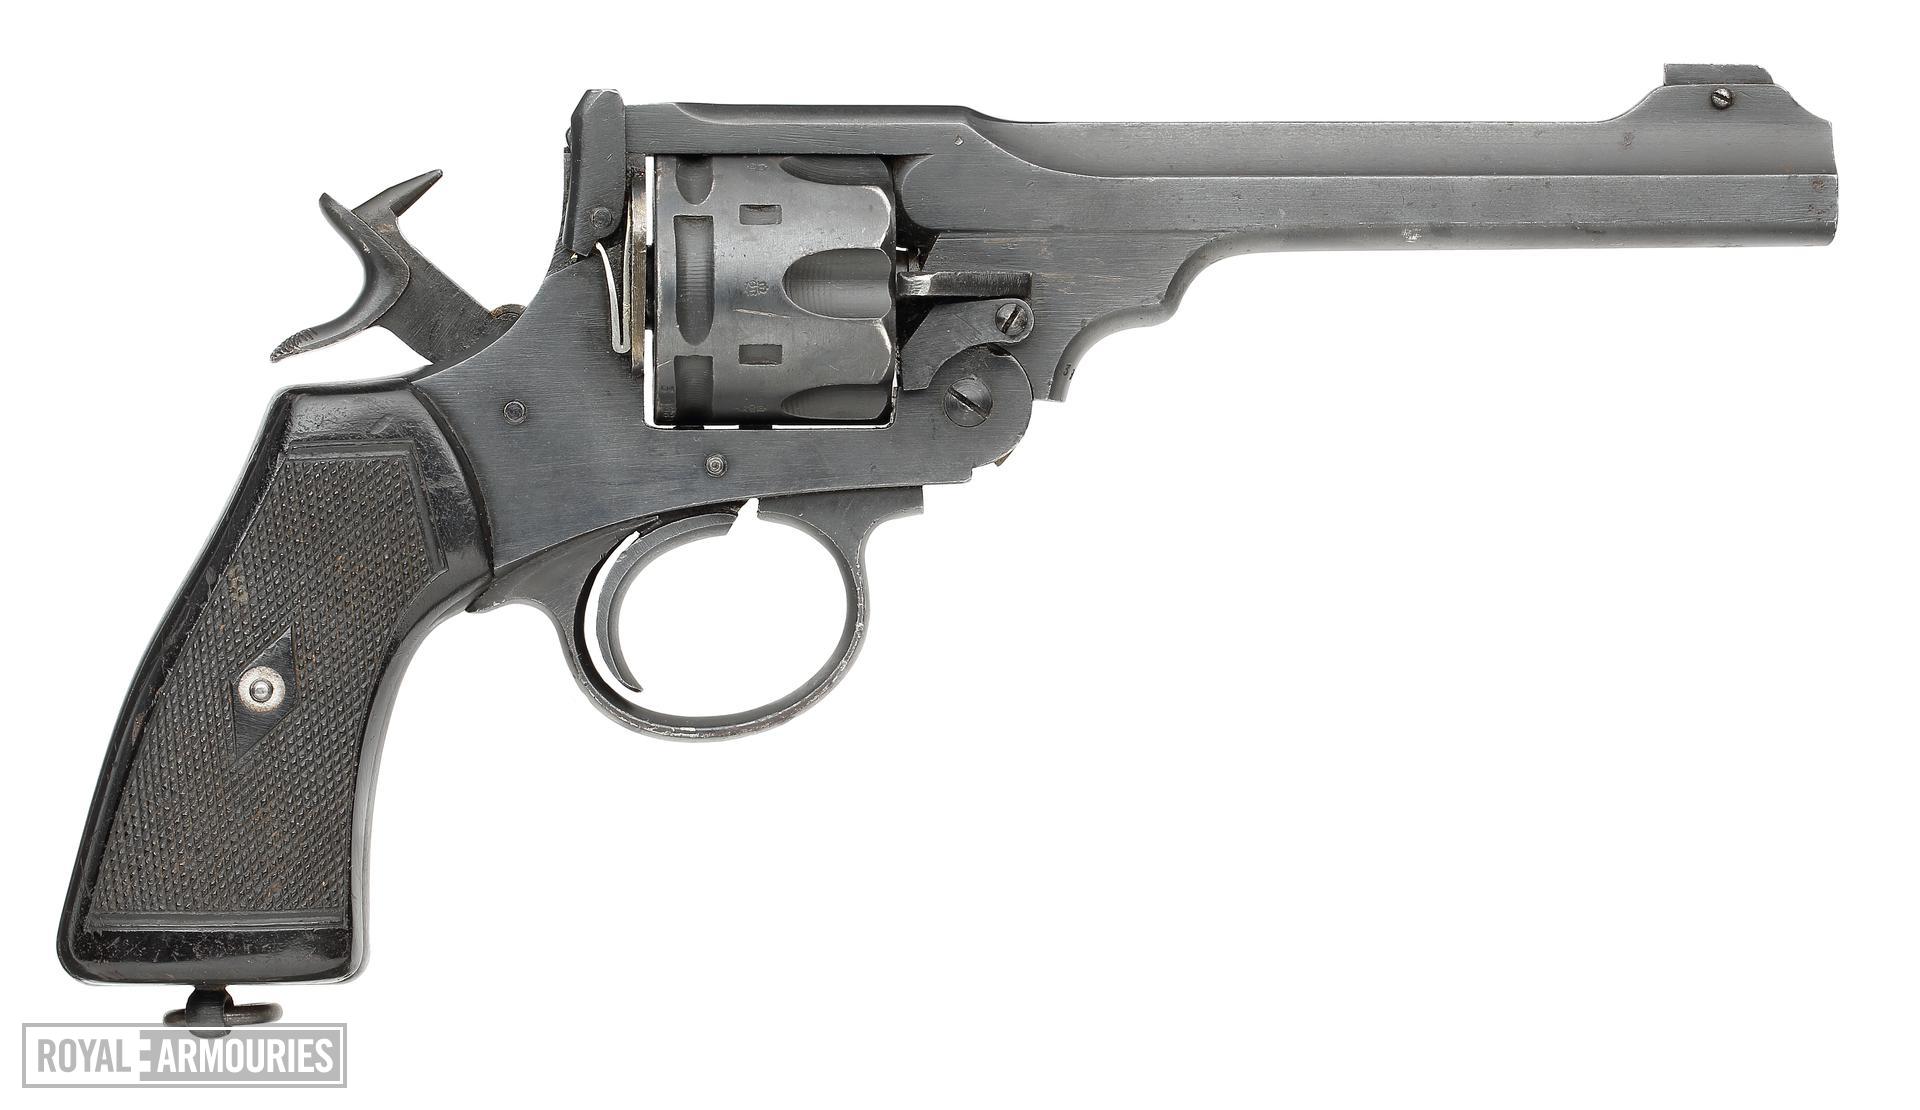
Webley revolver MkVI
British officers were always allowed to buy their own sidearms and by far one of the most popular choices was this handgun. This revolver had seen reliable service in the British Army for decades and variations of it were used in many significant colonial battles, such as at Rorke's Drift during the Zulu Wars. This tried and true reputation saw many British officers electing to take this powerful revolver with them into battle. Did it help them against the well defended German lines, the artillery, machine guns and gas? No. However, while a trusty pistol may not be capable of winning wars, they could save the lives of their owners. On a more unconventional note, the Webley was often employed as s a popular ratting weapon. British officers developed a strong hatred for rats especially when they used to lick the brilliantine (an old form of hair gel) out of their hair while they slept! So conversations in the officer's dugout were often punctuated by quick shots from this service revolver, at passing rats.
Central Powers
Central Powers
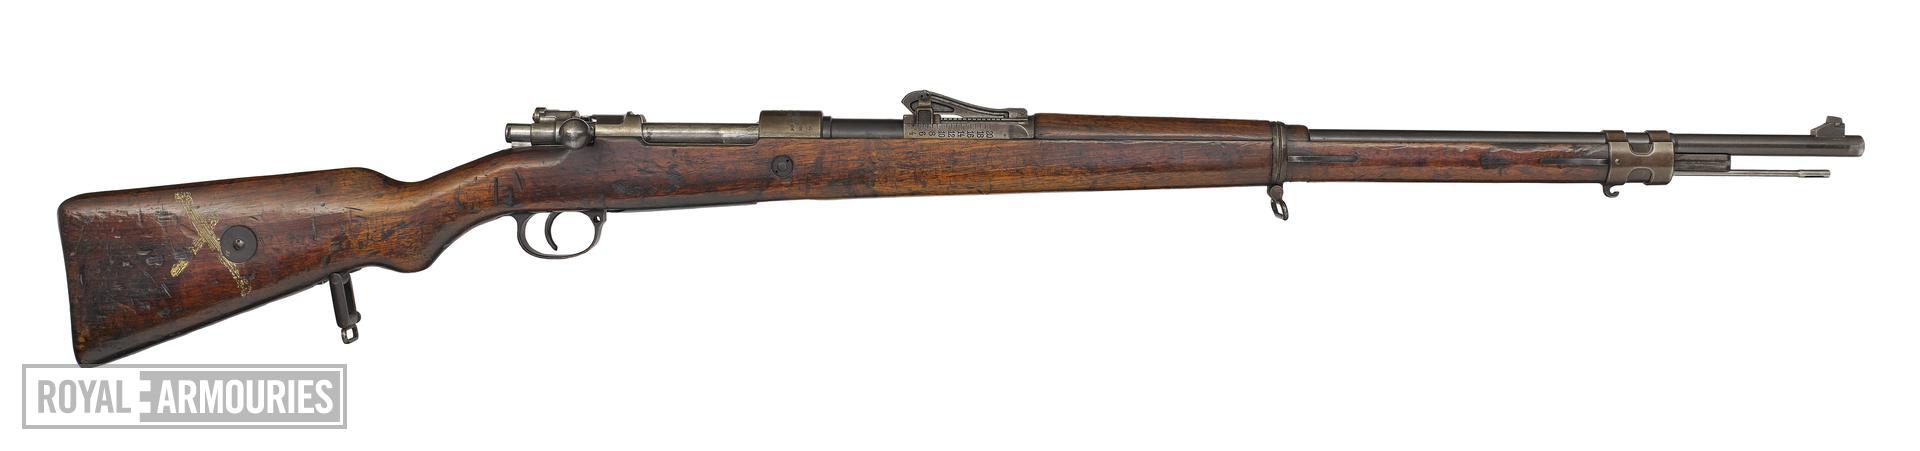
The German Empire
Mauser Gewehr 98
Germany was known for producing incredible hunters, armed with this reliable rifle, able to cope with the use of more powerful ammunition--there is little wonder the Germans were renowned for their marksmanship. Firing the powerful, 8mm round, this rifle was effective over long distances though its long length and small, five round internal magazine, made this rifle less suited to the close quarters fighting of the trenches. When equipped with a scope for the snipers of the German empire, this was a very precise and accurate rifle. Since it’s design in 1898, the Mauser bolt action system has been adopted nearly universally in most modern bolt actions. Indeed, the Americans prior to World War 1 faced a law suit in Germany for copying this rifle for use in their own M1903 bolt action, infantry rifle. However, due to it’s cock on open design, it is a slow bolt action to cycle compared to the British Lee Enfield.
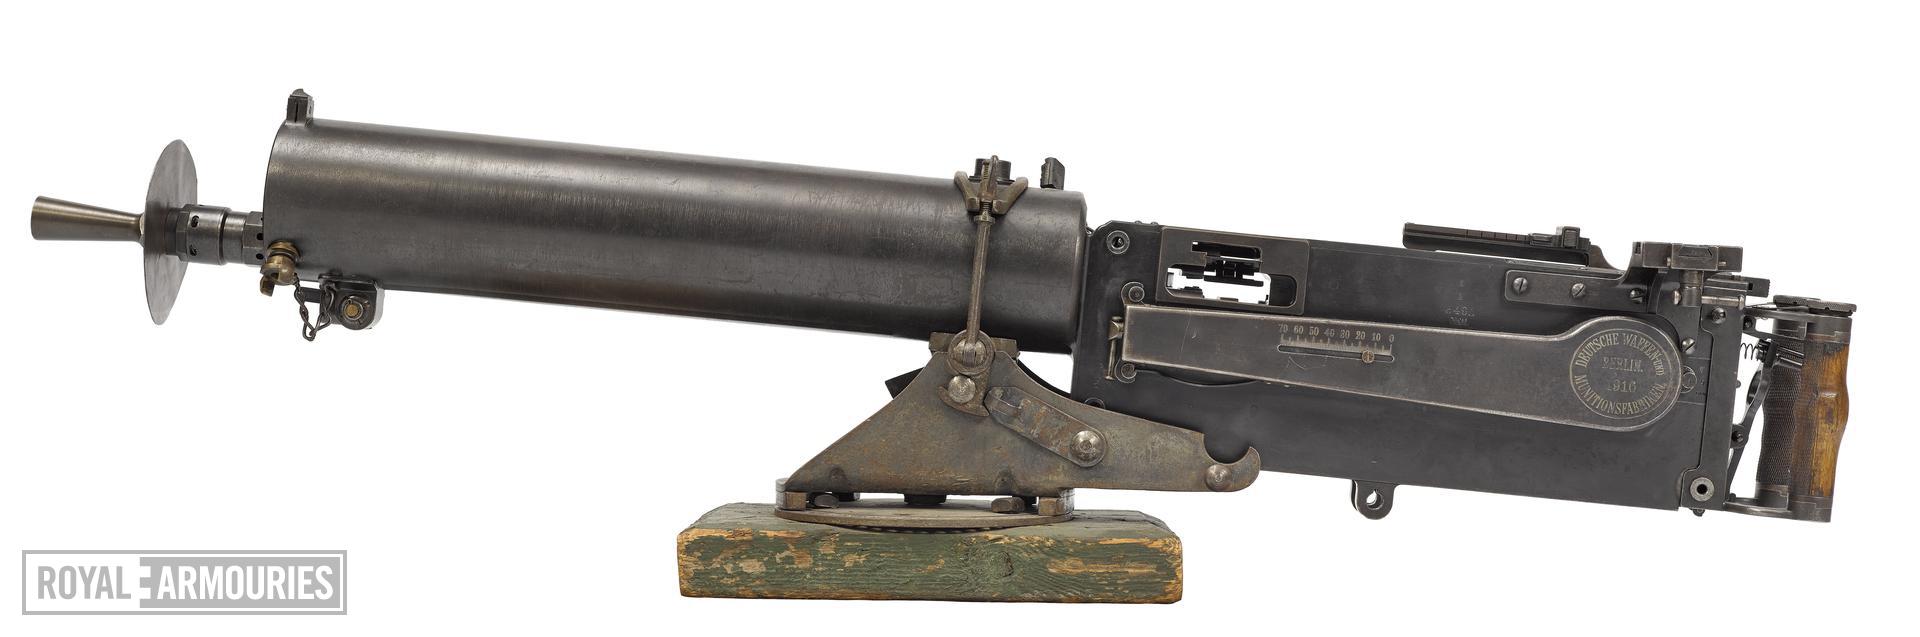
maschinengewehr 08
A copy of the British Maxim gun, the MG08 was the main Machine gun of the German Empire and was a common defensive weapon. It was water cooled which allowed it to shoot for a very long time without overheating. This was a truly devastating weapon that contributed to many young men losing their lives on the Entente side.

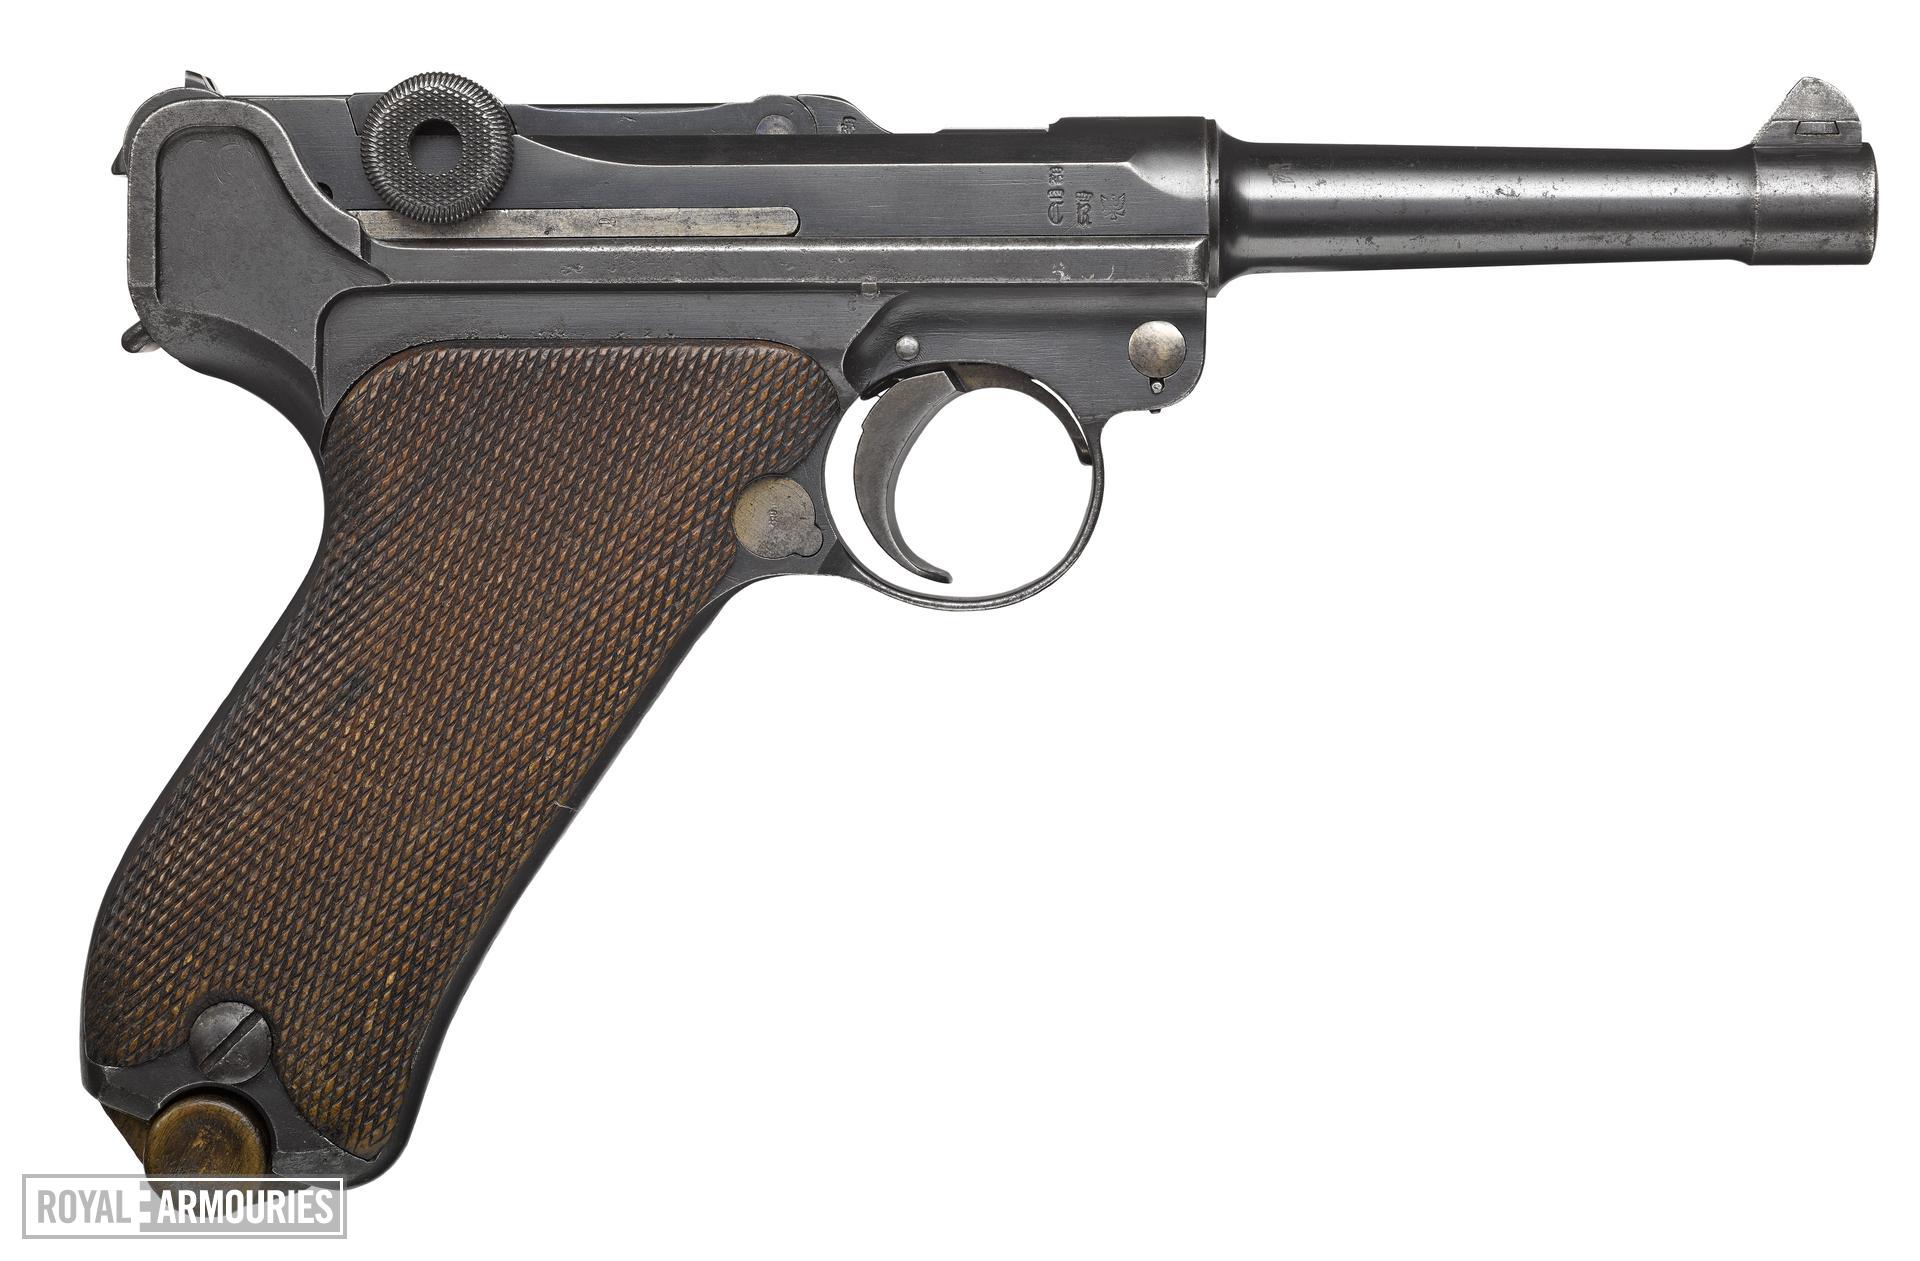
Pistole 1908
Adapted from the first successful semi-automatic pistol, the C93 Borchardt, this pistol invented by Georg J. Luger is iconic. This weapon was held only by officers in the German Army and was a prized trophy taken during nighttime trench raids by allied forces. The Germans were among the front-runners in the design of semi-automatic firearms, they developed a number of other such pistols, one such pistol, the Masuer C96, even saved Winston Churchill’s life during the Boer War.
Tanks
Tanks
Tanks At Passchendaele
It all started when...
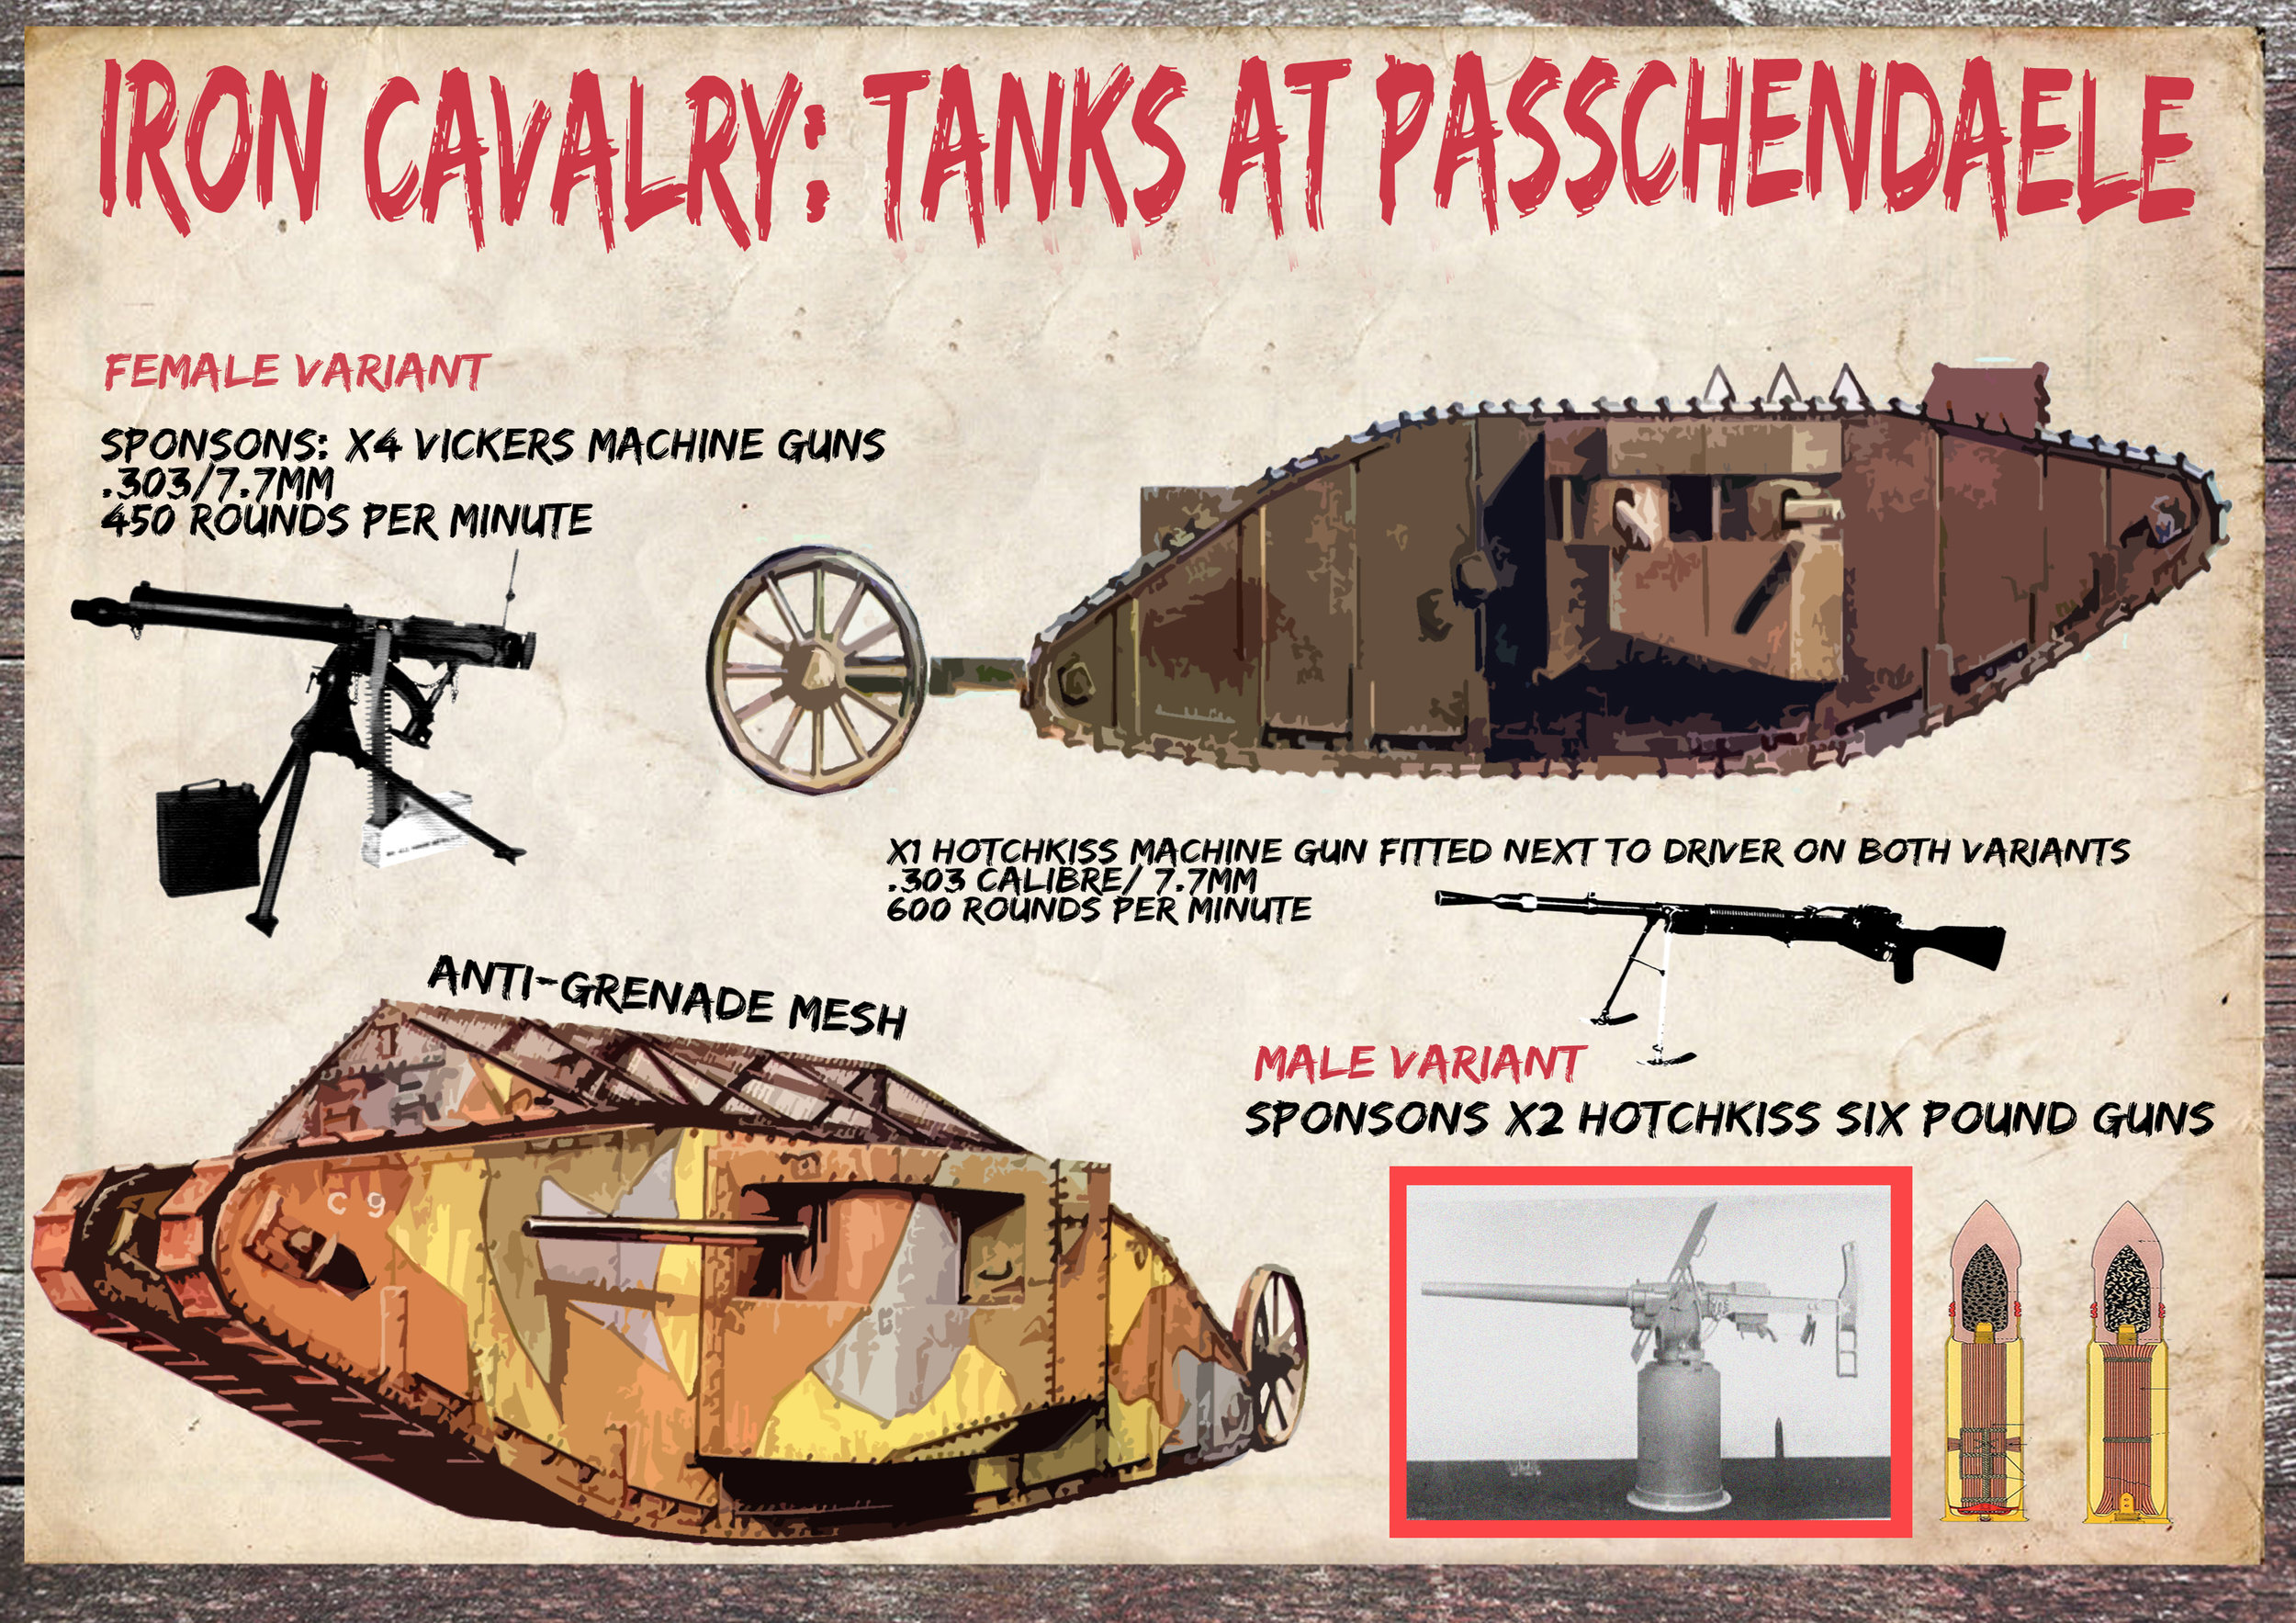
The British Mark 1 tank was the first tank in history. They were first put into use at the Somme in 1916. They would be deployed again at Passchendaele along with the newer, improved models. Tanks came in two forms, male and female. The male featured 2, 6 pound cannons and the female featured 4 machine guns. These were mounted in turrets on either side called sponsons. A variety of bells and whistles were added to tanks, from tools designed to help break barbed wire for infantry, to grenade deflecting mesh and various forms of camouflage. The crew of most tanks consisted of 8 men including gunners, gearsmen, and drivers. Tanks were notorious for a lack of reliability. While later on in the war, when commanders learned how to make better use of them, tanks helped to break the trench warfare stalemate and give Britain and her allies a massive advantage in the battles to come, but at Passchendaele, these lumbering behemoths were a liability—not a wonder weapon. Tanks frequently got bogged down in the mud and were easy prey for German artillery. They'd often arrive late to a rendez-vous or wouldn't show up at all, meaning the infantry had to once again face machine guns with no support. Business as usual.

The Germans were taken completely by surprise when it came to tanks, though they immediately looked for ways to deal with them. The first new weapon they created was the grenade bundle. By lashing together anywhere between 3 and 8 stick grenades, or potato mashers as the Tommies (British soldiers) called them, one could multiply their destructive potential. Next up came AT mines which were very deadly against tanks but wouldn't be triggered by infantry due to the fuze requiring greater pressure to detonate. The Germans also developed specialised ammunition for soldiers, called K-rounds. These were useful against the Mark 1's when fired from the standard German rifle, the Gewehr 98, however the greater armour of later models resulted in them being used more effectively in machine guns instead. German manufacturer Mauser, designed a massive rifle intended to fire a round that could penetrate the armour of a tank and ricochet inside making a cup-o-soup of the crew. Despite all of these new innovations, artillery was the biggest killer of tanks and their crews in the war.

This tank was bogged down in the mud at Passchendaele when a German artillery barrage destroyed it.

Here, some New Zealand soldiers pose with a captured German T-Gewehr, a massive anti-tank rifle. These guns were deadly to tanks as they could penetrate their armour but were rarely used effectively and no one wanted to shoot them for very long!

Often, the Germans would try to salvage British tanks because before 1918, they had none of their own. They would then use any captured tanks against the Allies of World War 1.

Some improvised German Anti-Tank grenades. Landships like the one in my poster used mesh to deflect these away from the hull.

The Germans dug many ditches like this one to trap tanks. This could stop advances that relied on tanks, dead in their tracks. Thus, at Passchendaele at least, tanks while used extensively, failed to have the desired impact on the tide of the war.
Tanks were used to destroy barbed wire in order for infantry to advance.
Planes Over Passchendaele
Planes Over Passchendaele
Planes Over Passchendaele
The war in the air was just as deadly as the one raging on the ground.

Find Out more about the planes flown by both sides below

The Central Powers:
The German, Austro-Hungarian and Ottoman Empires.

The Entente
The British, French and Russian Empires.
Planes Over Passchendaele: Entente
Planes Over Passchendaele: Entente
Planes Over Passchendaele

Sopwith Camel

Sopwith Tri-plane

Bristol F2B 'Brisfit'
Planes Over Passchendaele: Central Powers
Planes Over Passchendaele: Central Powers
Planes Over Passchendaele: The Central Powers
The latest aircraft fielded by the German, Austro-Hungarian and Ottoman Empires.

Fokker Dr.1

Halberstadt CL.II

Albatross D. III
Sopwith Camel
Sopwith Camel
Sopwith Camel
This highly maneouvreable and fast plane was the pride of the Royal Flying Corps.

Dogfighter extraordinaire
The Sopwith Camel became an icon of the RFC. It excelled in its role as a dogfighter and allowed the Entente to regain air superiority after, 'Bloody April,' when German planes ruled the skies. This plane rewarded a skilled pilot with a reliable and speedy machine that could swiftly tear through the best of the German Air Force's latest machines. The Sopwith Camel came in a few variations, notably, a carrier suited version for the Royal Navy, a night fighter used to destroy the bombers and Zeppelins attacking London and finally, a Trench Fighter with ground attack capabilities.
Poaching the pitiless skies
Dogfights came down to a great many factors but most important among them are, speed, agility and positioning. The Sopwith F1 was in this regard, one of the best fighter planes of the war.

x2 Vickers .303 machine guns
Unlike the Lewis guns of planes past, Camels were equipped with the more reliable and faster firing Vickers machine gun. British ace James 'Mac' McCudden missed his shot at taking down the Red Baron due to a jammed Lewis Gun. This weapon was far superior and shows how the Sopwith Camel was a much more modern and improved design. This gun was synced to fire through the propellor of the plane allowing the pilot to aim with the nose of his machine.
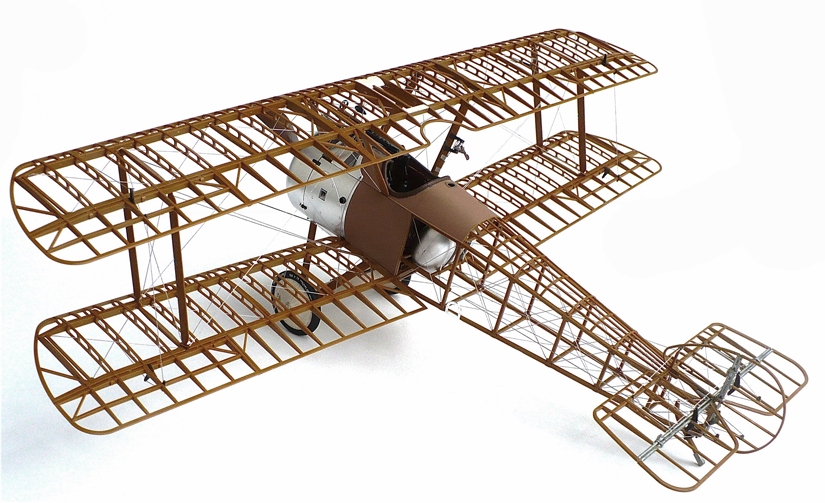
Improved Airframe
The airframe of the Sopwith Camel was designed for extreme mobility. This made it a difficult plane to fly but it allowed an already experienced pilot to take full advantage of its capabilities.

Powerful Rotary Engine
The Camel's engine allowed it to achieve wicked speed with a maximum of around 180km/h. This made it one of the quickest fighters of its day yet innovation happened very quickly in the Great Wa and Fokker D.VII's and the later Sopwith Dragon would outpace it.
Bristol F2B 'Brisfit'
Bristol F2B 'Brisfit'
Bristol F2B
A highly stable plane, the Brisfit was well loved by RFC pilots who valued a reliably controllable mount.


Strong and Stable
Able to hold it's own against many of Germany's advanced, smaller planes, the Brisfit was a successful addition to the RFC's arsenal.

Two's a team
In addition to aerial reconnaissance photography and navigation, the second seat occupant was a tailgunner. With a Vickers machine gun located in the front synced to the propeller of the plane allowing the pilot to initiate a dogfight, the Bristol was unique in that it also had a Lewis gun mounted in the back. This allowed the gunner to guard the plane's six.

Long Service
The Brisfit was such a modern and successful plane that it remained in service well into the 1930's.
Sopwith Tri-plane
Sopwith Tri-plane
Sopwith Tri-plane
One of the most advanced planes of its time, a nifty fighter in the right hands.


Light-weight air frame
The Sopwith Tri-plane was a highly controllable plane and favoured stability and the ability to turn tightly over firepower or speed. Slower than the other two entente planes looked at here, the tri-plane had to rely on it's ability to handle well. Armed with only one Vickers machine gun, this light aircraft was a capable light fighter.

Reliable
With a modern cockpit featuring optics and a sighting system for its single synchronised machine gun, the tri-plane was truly an innovative aircraft. The plane was more reliable than its predecessors and offered a stable mount for the squadrons it flew with.

Mount of Choice
The Sopwith Tri-plane was the fighter of choice for New Zealand's second best ace, Thomas Culling. He made his fame by flying one of these fine aircraft against the Germans in the Western Front during 1917. This Kiwi ace was one of the few to have more than five recorded victories out of all the New Zealand pilots, owing it all to his ability to take advantage of this fighter's strength.
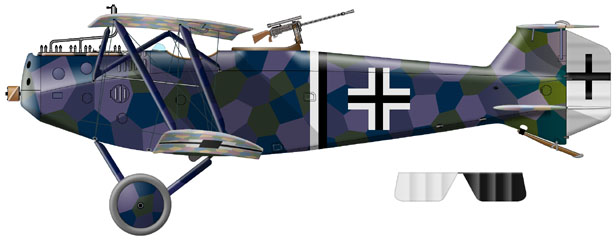
Fokker DR 1.
Fokker DR 1.
Fokker DR 1.
The iconic three winged plane made famous by Manfred von Richtoffen, the Red Baron.


Serious Firepower
Taking full advantage of Fokker's synchronisation system, the DR1. features two MG08/15 8mm machine guns in a forward firing position allowing the pilot to reload and clear any jams from the safety of the cockpit and accurately aim his weapons.

Three times the mobility
With three wings, this plane was able to make some nifty maneuvers and out turn many of the best biplanes the entente had such as the SE5. This plane was no slouch in the speed department with a wicked quick 185 km/h maximum velocity. This plane was vastly superior to the Sopwith Tri-Plane equivalent. Amazing but not invincible, this plane had some weaknesses in its wing design and had poor vertical visibility allowing entente pilots a window of opportunity from above or below.
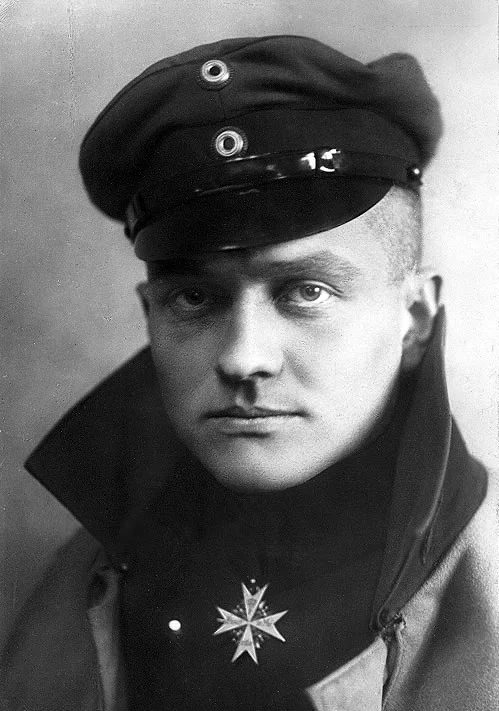
Manfred von Richthofen
Flying the infamous all red DR 1. number 425/17, the Red Baron racked up his aerial victories whilst flying one of these awesome machines. The DR1. was a vast improvement over the albatross which Richthofen had made his name. The Red Baron had to give up on making his silver cups for each of his victories as he was attaining too many kills and there was not enough silver on hand for them to be made.

The Red Baron’s Victory Cups
Richthoffen marked the number, type of plane and the date of each victory on silver cups.
Halberstadt
Halberstadt
Halberstadt CL.II
The first effective ground attack plane.


Ground attack
The idea of ground attack was a new one thus the initial weapons available were fairly primitive. The CL2 employed racks of up to 10 stick grenades on the side of the plane which would be dropped on enemy trenches. Later, specialised shells were dropped from racks on the bottom of the planes as one might expect from a modern plane.

Multi-role
The Halberstadt had a forward firing machine 08/15 machine gun and a scoped rear mounted MG14 parabellum. These enabled the Halberstadt to defend itself in the air. This gave the CL II a wide range of capabilities and arguably made it the best multi-role aircraft of the war.
A heavier plane
Despite a Mercedes D.III water cooled engine, the added weight of its weaponry made the planes weigh around 1300kg giving it a rather sluggish speed of 164km/h max.
Albatross
Albatross
Albatross
The controllable plane that made many a Central Powers ace.


Jasta 11
The elite squadron led by the Red Baron himself were all at one stage equipped with the Albatross DIII. This plane gave Germany aerial superiority during Bloody April and gave many of Germany's best pilots their fame.

Ernst Udet
This ace came into his own after the Red Baron was shot down. Udet was the leading ace of the German Empire in terms of victories following the Baron's death and he survived the whole of the First World War and became a leading member of the Luftwaffe in World War 2. Udet had a legendary career before it ended in his suicide as a result of his guilt during World War 2. Ernst Udet found his glory flying the Albatross.

Werner Voss
Before upgrading to a Fokker DR1. as Richthofen did, Voss was known for flying an Albatross with his signature heart on it. This plane taught Voss the sesnibilities of dogfighting that he'd come to rely on during his last stand agaisnt no less than 3 British aces led by James McCudden whom he held out against for 8 minutes before going down. He was regarded just as highly by his friends as his enemies.